> ## Documentation Index
> Fetch the complete documentation index at: https://link.datarelay.run/llms.txt
> Use this file to discover all available pages before exploring further.
# Server Installation
> Install and verify the Data Relay Link server using the current stable release.
# Server Installation
The Data Relay Link server is the public entry point. It runs the bundled relay-server runtime plus enrollment, registry, lifecycle, and `drlink` management components.
## Recommended first environment
For the simplest first deployment, use an **Ubuntu 24.04 x86\_64** server with a direct public IP. Ubuntu 24.04 is the clearest Real E2E-validated server baseline for the stable release; Ubuntu 22.04 has automated portability coverage but is not presented as an equivalent real-host validation claim.
If you do not already have a static public IP or spare Linux server, use the screenshot-based [OCI Free Tier Server Preparation](/getting-started/oci-free-tier-server) guide to prepare an Always Free-eligible Ubuntu VM with a Reserved Public IPv4 address first.
Other Linux families have different validation levels; see [Supported Platforms](/reference/platforms).
## Choose the topology first
The original field guide summarized the three common network layouts in one diagram. Use it as a visual map before choosing the actual product mode.
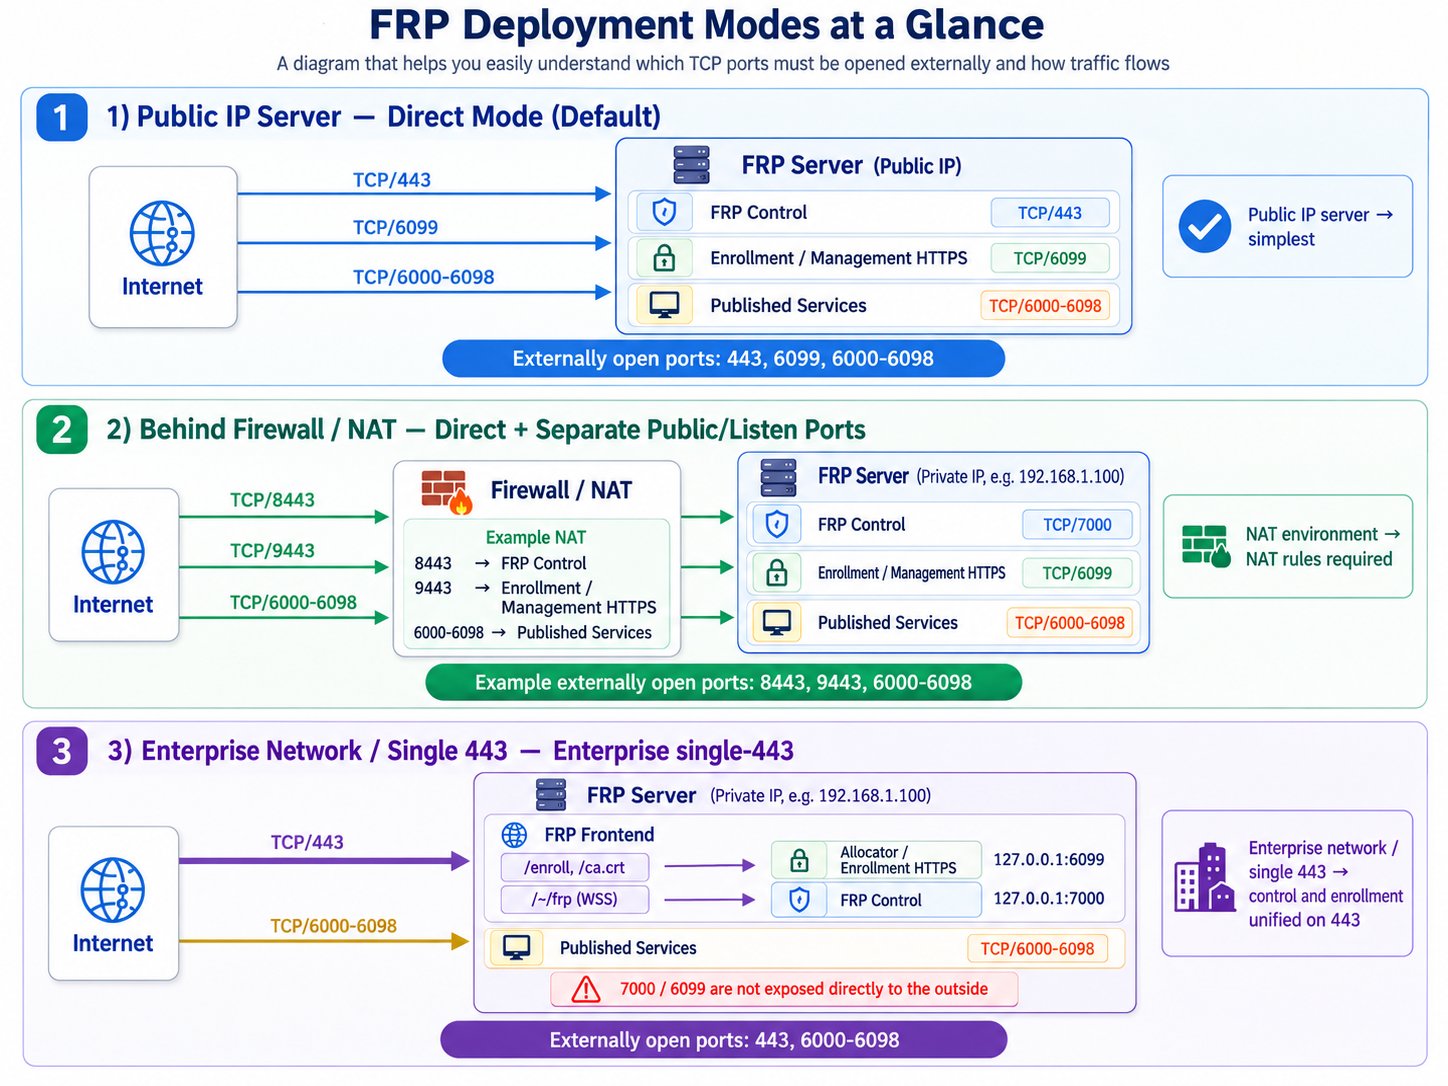 The diagram shows **Direct**, **Direct behind NAT**, and **Enterprise single-443** as network layouts. NAT itself is not a third product mode; the product modes are Direct and Enterprise single-443.
```mermaid theme={null}
flowchart TD
A[Start] --> B{Can the server receive\npublic Internet traffic?}
B -->|Direct public IP| C[Direct mode\n443 + 6099 + service range]
B -->|Behind firewall/NAT| D[Configure DNAT\npublic endpoints -> internal server]
C --> E{Does the client network\nrequire everything on TLS/443?}
D --> E
E -->|No| F[Use Direct]
E -->|Yes / TLS reset on non-standard ports| G[Consider Enterprise single-443]
```
NAT is a network topology, not a third Data Relay Link mode. The two product modes are **Direct** and **Enterprise single-443**.
## Direct mode defaults
```mermaid theme={null}
flowchart LR
I[Internet]
S[Data Relay Link server]
I -->|TCP 443\nData Relay Link control| S
I -->|TCP 6099\nEnrollment / management HTTPS| S
I -->|TCP 6000-6098\nPublished services| S
```
TCP/22 is optional for your own administrative SSH access to the server; it is not part of the Data Relay Link tunnel path.
## If the server is behind NAT
Example:
```mermaid theme={null}
flowchart LR
I[Internet\n203.0.113.10]
F[Firewall / NAT]
S[Data Relay Link server\n192.0.2.50]
I -->|8443| F -->|443| S
I -->|9443| F -->|6099| S
I -->|6000-6098| F -->|same ports| S
```
Clients must use the **public** control/enrollment endpoints, not the server's private address. See [Firewall & NAT](/deployment/firewall-nat).
## Install the current stable release
Current published stable: **v2.2.1** with bundled/tested relay engine **v0.71.0**.
```bash theme={null}
curl -fsSL \
https://raw.githubusercontent.com/xdr-labs/frp-auto-deploy/v2.2.1/dist/bootstrap-server.sh \
| sudo bash
```
Use the immutable stable tag for field installs rather than mutable `main` unless you intentionally want development behavior.
## What the installer asks for
Expect questions about:
1. public IP / public control endpoint
2. optional public service hostname
3. internal server IP
4. Direct vs Enterprise single-443
5. public and local control ports
6. public and local enrollment/allocator ports
7. published service range
The installer does **not** create AWS Security Groups, OCI Security Lists, external firewall/NAT rules, UFW/firewalld/iptables policy, or DNS records.
## Verify immediately after installation
```bash theme={null}
sudo drlink show version
sudo drlink show status
sudo drlink doctor
```
`doctor` is read-only and checks installation state, permissions, PKI, service state, registry consistency, topology, and common network problems.
## Persistent state you should understand
```text theme={null}
/etc/frp-auto-deploy/config.json
/etc/frp-auto-deploy/pki/
/etc/frp/server_token
/var/lib/frp-auto-deploy/registry.json
```
These files/state protect trust, identity, and public-port reservations. Do not manually edit them during normal operation.
## Server readiness checklist
* required systemd services are active
* `drlink doctor` has no blocking finding
* public control/enrollment endpoints are reachable from the client network
* published service range is allowed by the server-side firewall/NAT
* if using DNS, the public hostname resolves to the correct public entry point
## Next
* [Quick Start](/getting-started/quickstart)
* [Deployment Modes](/deployment/modes)
* [Firewall & NAT](/deployment/firewall-nat)
* [Network Ports](/reference/network-ports)
The diagram shows **Direct**, **Direct behind NAT**, and **Enterprise single-443** as network layouts. NAT itself is not a third product mode; the product modes are Direct and Enterprise single-443.
```mermaid theme={null}
flowchart TD
A[Start] --> B{Can the server receive\npublic Internet traffic?}
B -->|Direct public IP| C[Direct mode\n443 + 6099 + service range]
B -->|Behind firewall/NAT| D[Configure DNAT\npublic endpoints -> internal server]
C --> E{Does the client network\nrequire everything on TLS/443?}
D --> E
E -->|No| F[Use Direct]
E -->|Yes / TLS reset on non-standard ports| G[Consider Enterprise single-443]
```
NAT is a network topology, not a third Data Relay Link mode. The two product modes are **Direct** and **Enterprise single-443**.
## Direct mode defaults
```mermaid theme={null}
flowchart LR
I[Internet]
S[Data Relay Link server]
I -->|TCP 443\nData Relay Link control| S
I -->|TCP 6099\nEnrollment / management HTTPS| S
I -->|TCP 6000-6098\nPublished services| S
```
TCP/22 is optional for your own administrative SSH access to the server; it is not part of the Data Relay Link tunnel path.
## If the server is behind NAT
Example:
```mermaid theme={null}
flowchart LR
I[Internet\n203.0.113.10]
F[Firewall / NAT]
S[Data Relay Link server\n192.0.2.50]
I -->|8443| F -->|443| S
I -->|9443| F -->|6099| S
I -->|6000-6098| F -->|same ports| S
```
Clients must use the **public** control/enrollment endpoints, not the server's private address. See [Firewall & NAT](/deployment/firewall-nat).
## Install the current stable release
Current published stable: **v2.2.1** with bundled/tested relay engine **v0.71.0**.
```bash theme={null}
curl -fsSL \
https://raw.githubusercontent.com/xdr-labs/frp-auto-deploy/v2.2.1/dist/bootstrap-server.sh \
| sudo bash
```
Use the immutable stable tag for field installs rather than mutable `main` unless you intentionally want development behavior.
## What the installer asks for
Expect questions about:
1. public IP / public control endpoint
2. optional public service hostname
3. internal server IP
4. Direct vs Enterprise single-443
5. public and local control ports
6. public and local enrollment/allocator ports
7. published service range
The installer does **not** create AWS Security Groups, OCI Security Lists, external firewall/NAT rules, UFW/firewalld/iptables policy, or DNS records.
## Verify immediately after installation
```bash theme={null}
sudo drlink show version
sudo drlink show status
sudo drlink doctor
```
`doctor` is read-only and checks installation state, permissions, PKI, service state, registry consistency, topology, and common network problems.
## Persistent state you should understand
```text theme={null}
/etc/frp-auto-deploy/config.json
/etc/frp-auto-deploy/pki/
/etc/frp/server_token
/var/lib/frp-auto-deploy/registry.json
```
These files/state protect trust, identity, and public-port reservations. Do not manually edit them during normal operation.
## Server readiness checklist
* required systemd services are active
* `drlink doctor` has no blocking finding
* public control/enrollment endpoints are reachable from the client network
* published service range is allowed by the server-side firewall/NAT
* if using DNS, the public hostname resolves to the correct public entry point
## Next
* [Quick Start](/getting-started/quickstart)
* [Deployment Modes](/deployment/modes)
* [Firewall & NAT](/deployment/firewall-nat)
* [Network Ports](/reference/network-ports)