> ## Documentation Index
> Fetch the complete documentation index at: https://link.datarelay.run/llms.txt
> Use this file to discover all available pages before exploring further.
# OCI Network와 VM
> DataRelay Link Server용 OCI Network, Ubuntu VM, Reserved Public IPv4를 구성합니다.
# Part I — OCI 네트워크와 VM 만들기
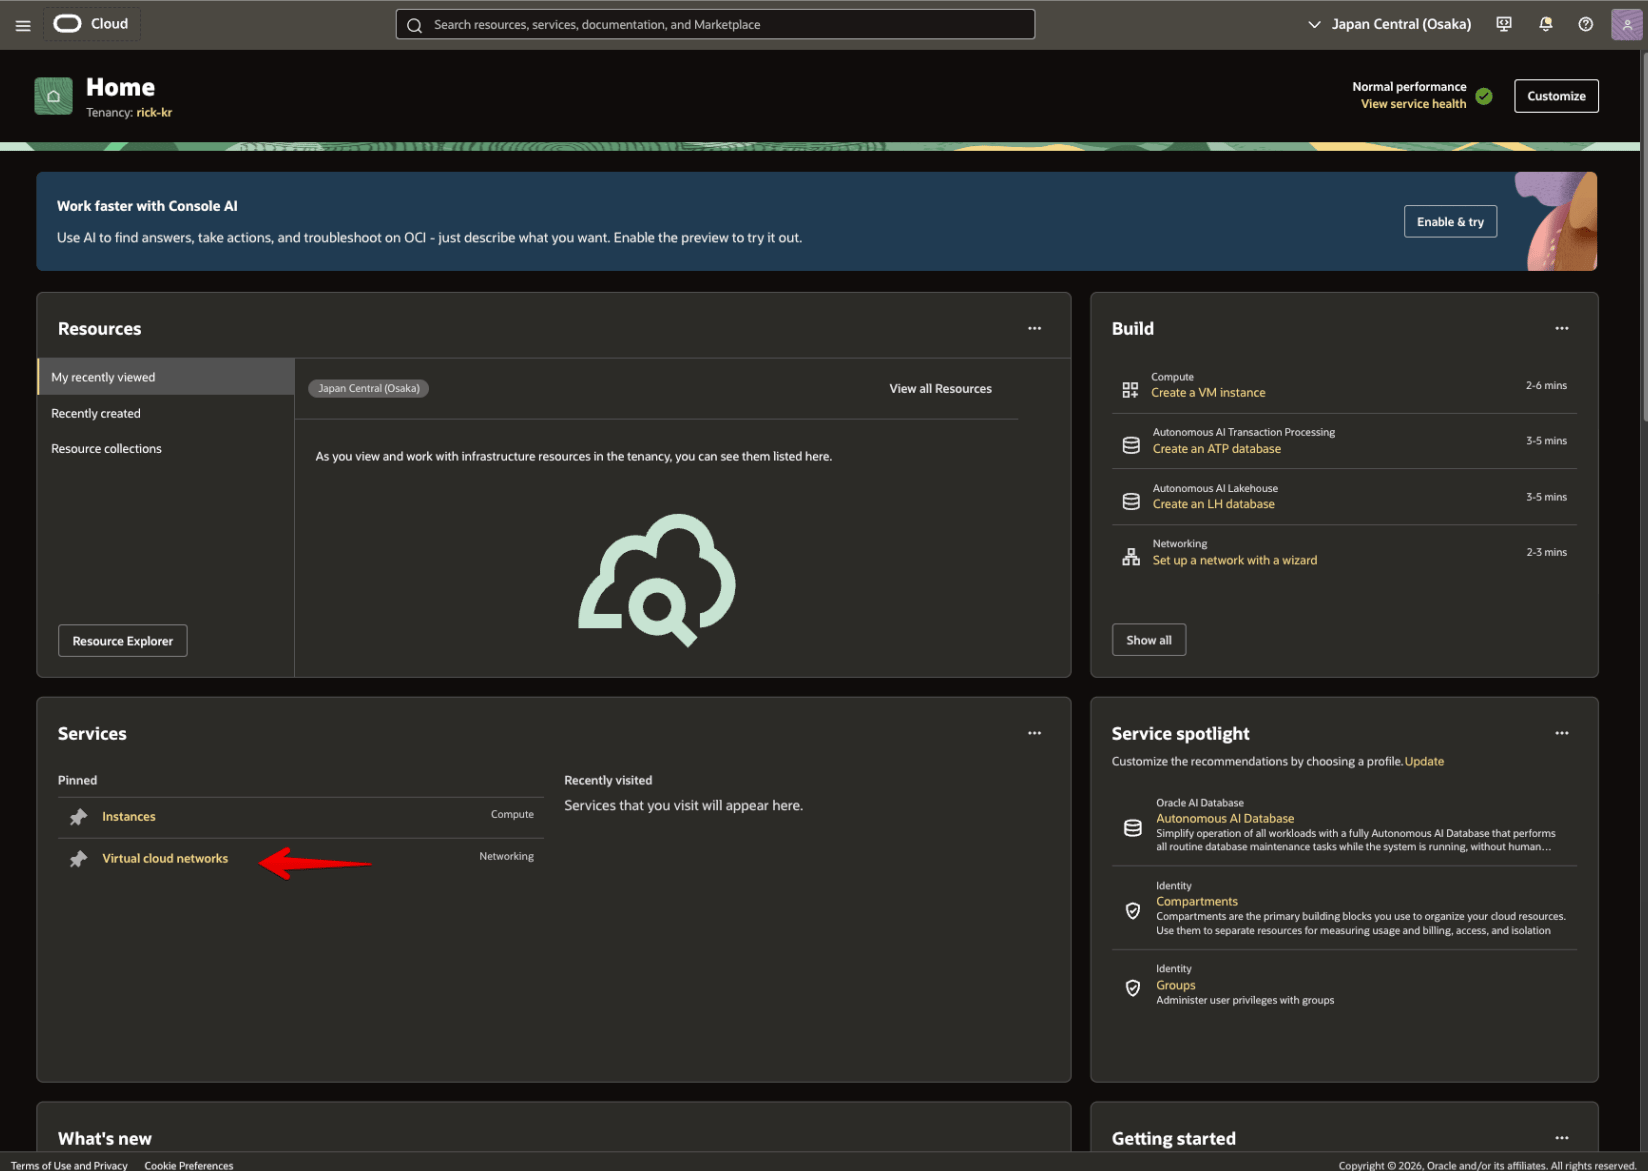
## 1. Virtual Cloud Networks로 이동
OCI Home에서 **Networking → Virtual Cloud Networks**로 이동합니다. 아래 화면은 기존 실구축 Word 문서의 **그림 1 원본 이미지**입니다. 이미지 변환이나 축소본을 사용하지 않습니다.
 ## 2. VCN, Internet Gateway, Route, Public Subnet, Ingress 구성
다음 값을 사용합니다.
```text theme={null}
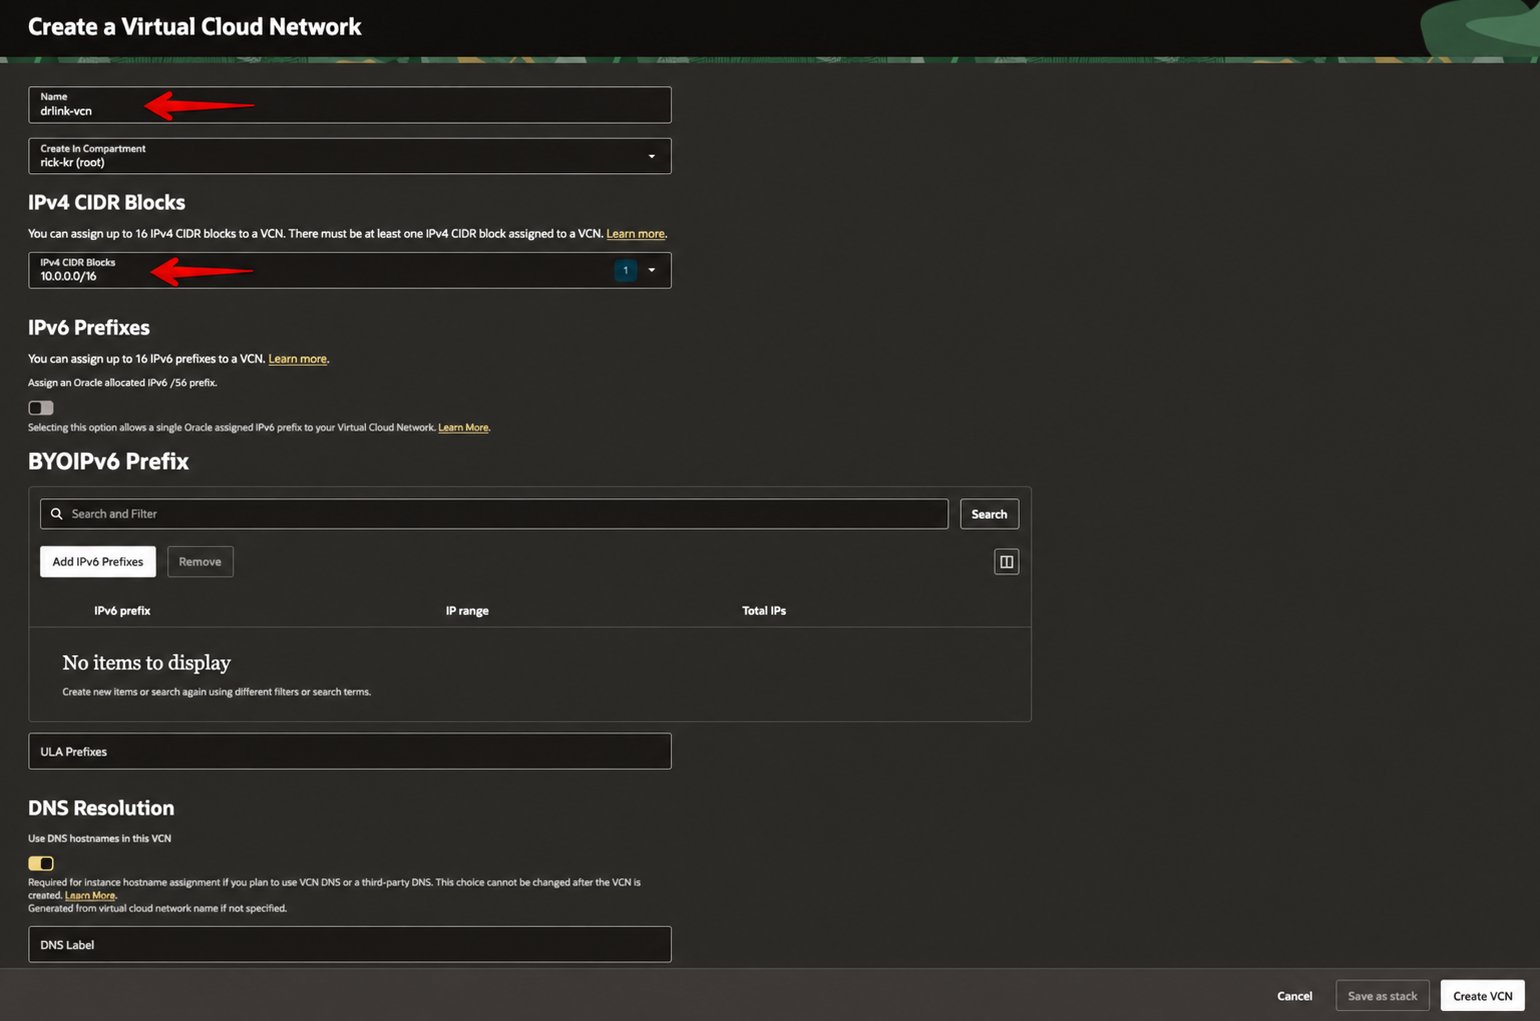
VCN name data-relay-vcn
VCN IPv4 CIDR 10.0.0.0/16
Internet Gateway data-relay-internet-gateway
Default route 0.0.0.0/0 -> Internet Gateway
Public subnet data-relay-public-subnet
Public subnet CIDR 10.0.0.0/24
Subnet type Regional / Public
```
### 2-1. VCN 생성
**Virtual Cloud Networks → Create VCN**으로 이동합니다.
## 2. VCN, Internet Gateway, Route, Public Subnet, Ingress 구성
다음 값을 사용합니다.
```text theme={null}
VCN name data-relay-vcn
VCN IPv4 CIDR 10.0.0.0/16
Internet Gateway data-relay-internet-gateway
Default route 0.0.0.0/0 -> Internet Gateway
Public subnet data-relay-public-subnet
Public subnet CIDR 10.0.0.0/24
Subnet type Regional / Public
```
### 2-1. VCN 생성
**Virtual Cloud Networks → Create VCN**으로 이동합니다.
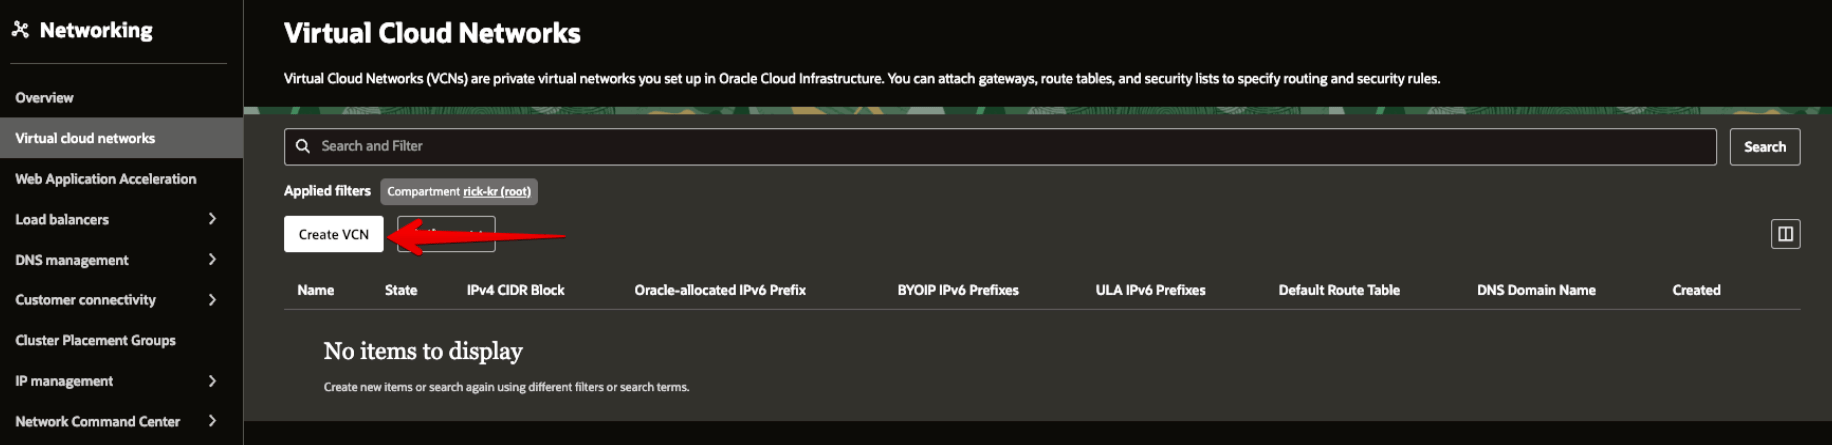 VCN 이름은 `data-relay-vcn`, IPv4 CIDR은 `10.0.0.0/16`으로 설정합니다.
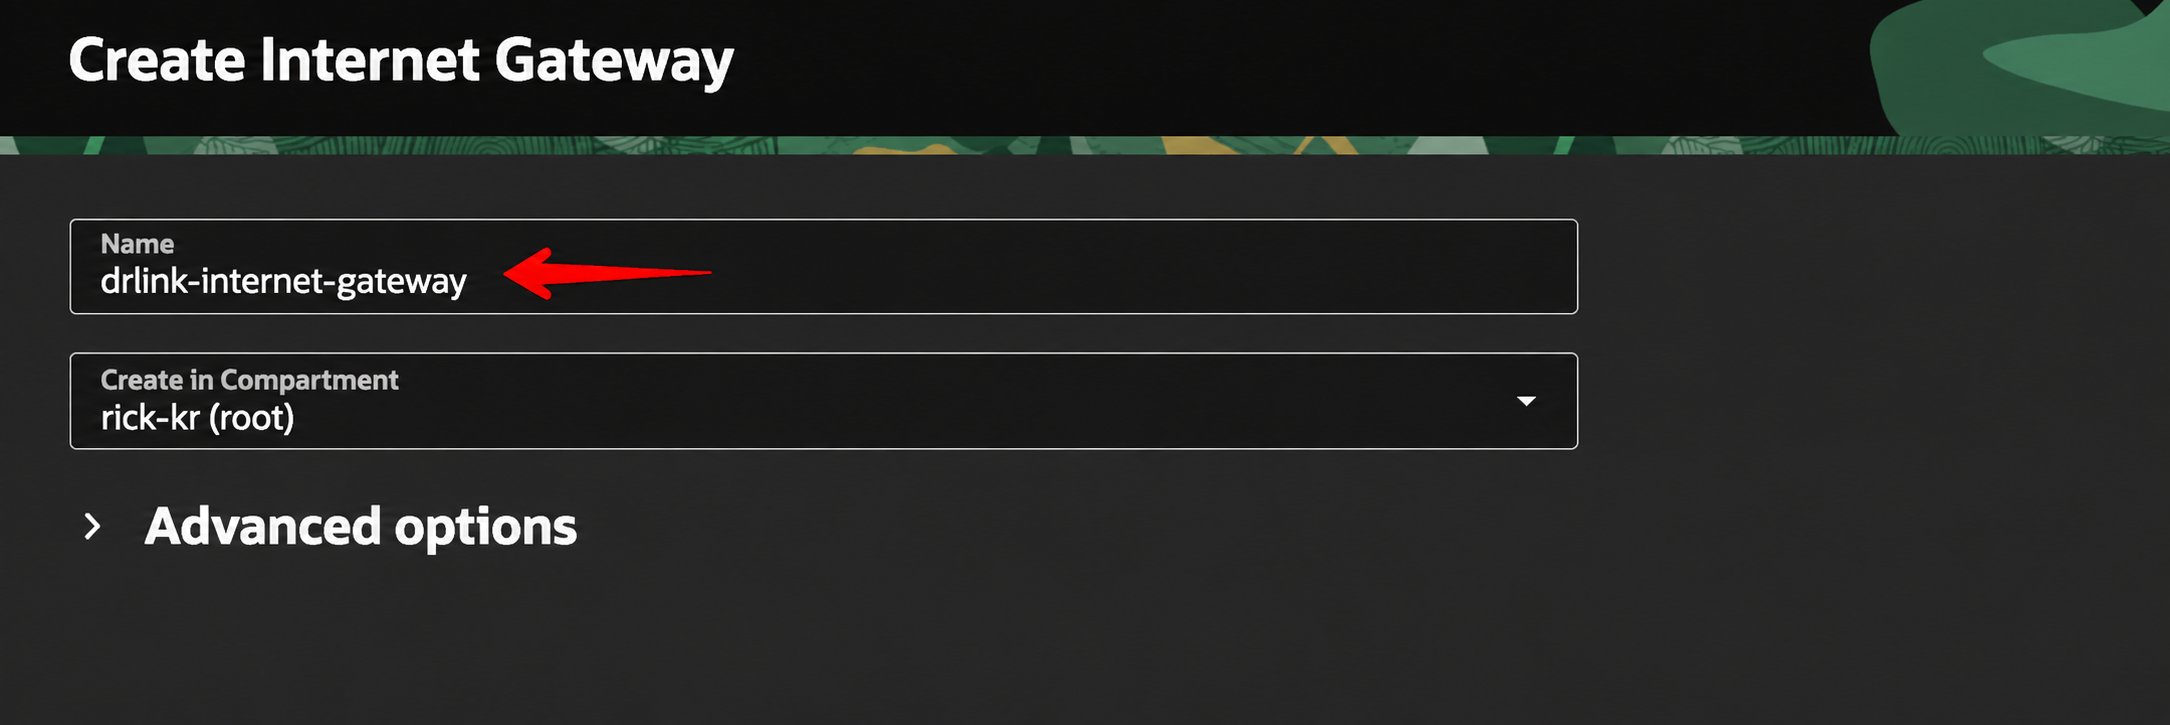
 ### 2-2. Internet Gateway 생성
생성한 `data-relay-vcn`의 **Gateways** 탭에서 Internet Gateway를 생성합니다.
### 2-2. Internet Gateway 생성
생성한 `data-relay-vcn`의 **Gateways** 탭에서 Internet Gateway를 생성합니다.
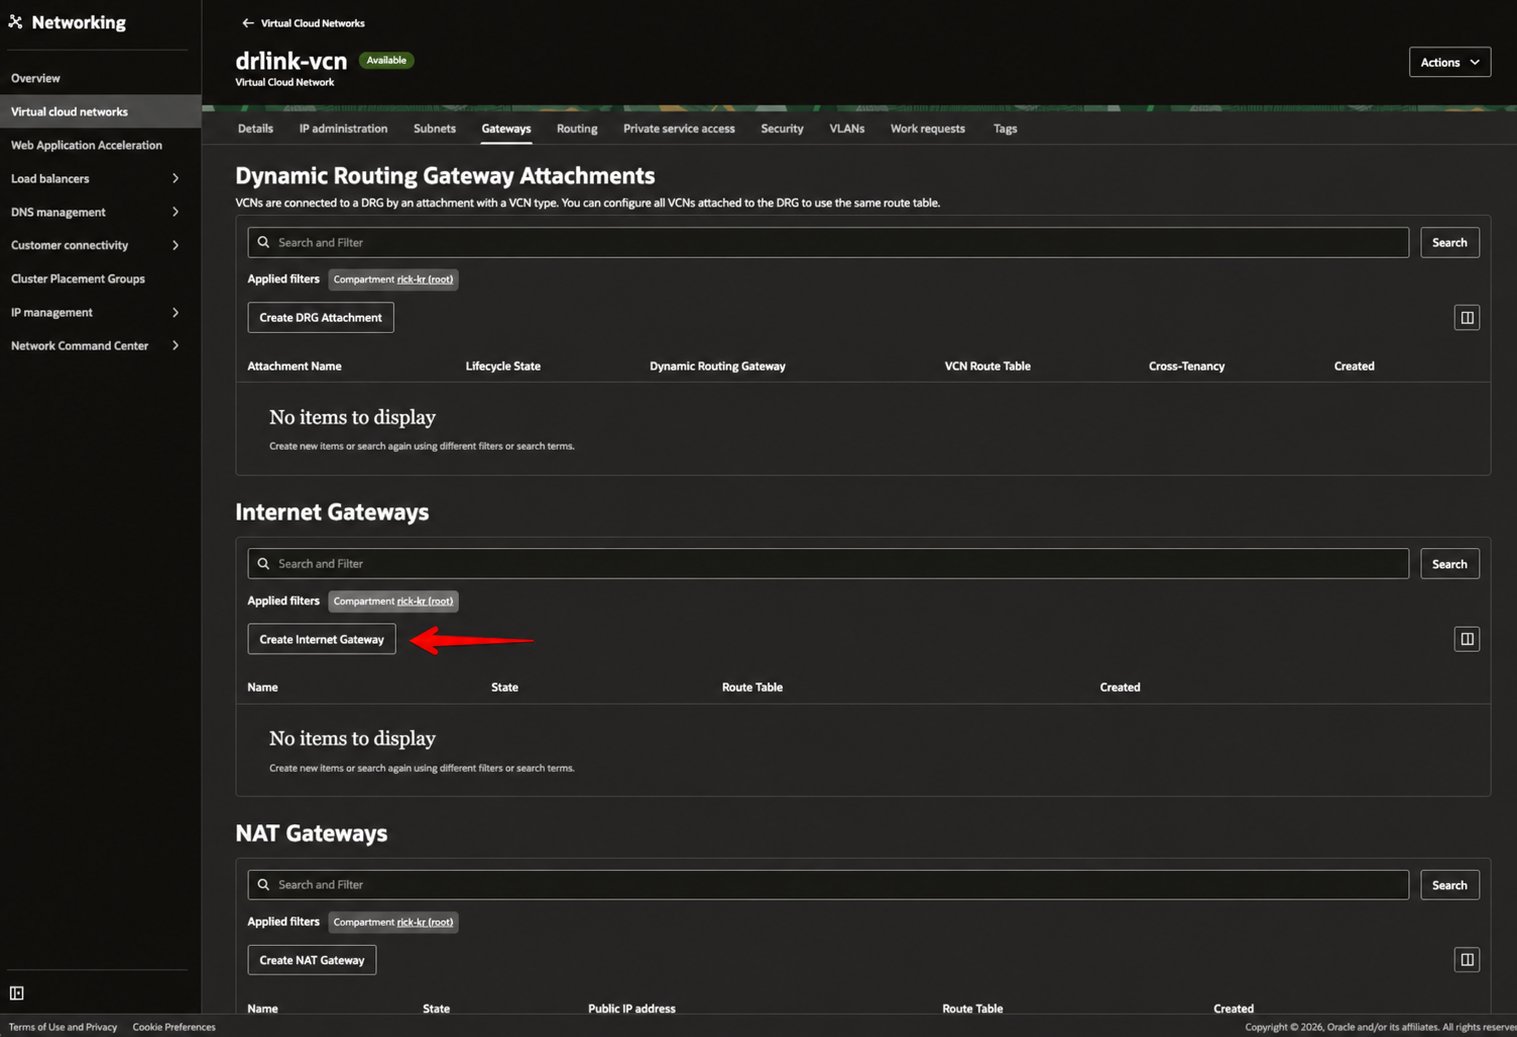 Internet Gateway 이름은 예제 기준 `data-relay-internet-gateway`입니다.
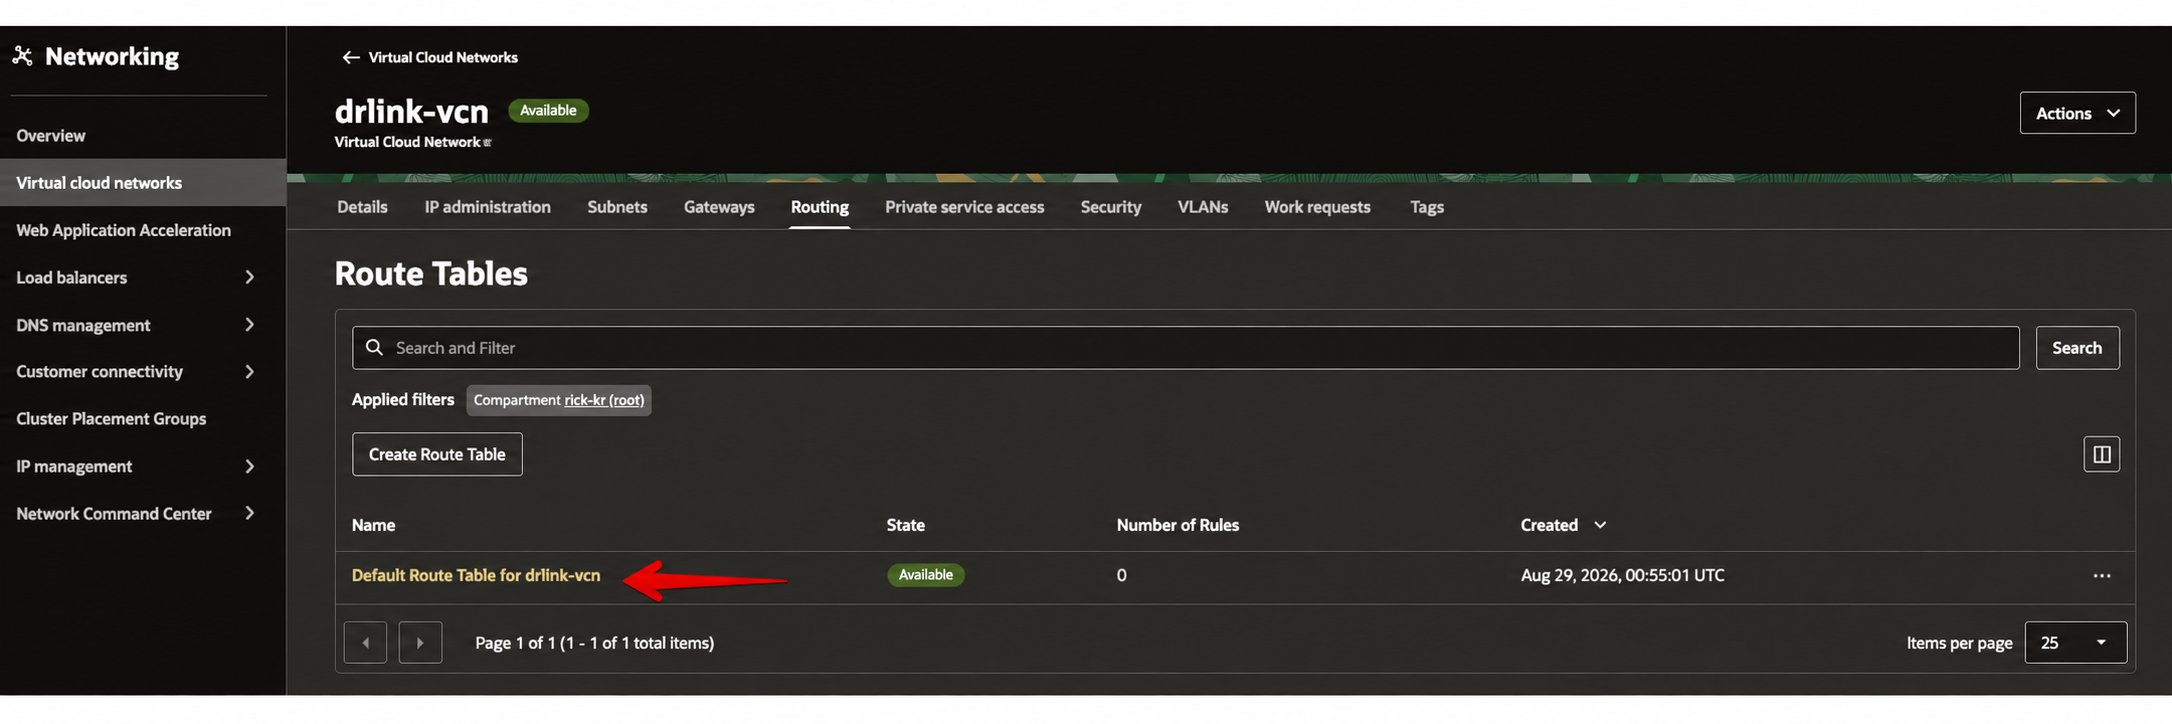
 ### 2-3. Default Route Table에 인터넷 경로 추가
**Routing** 탭에서 `Default Route Table for data-relay-vcn`을 선택합니다.
### 2-3. Default Route Table에 인터넷 경로 추가
**Routing** 탭에서 `Default Route Table for data-relay-vcn`을 선택합니다.
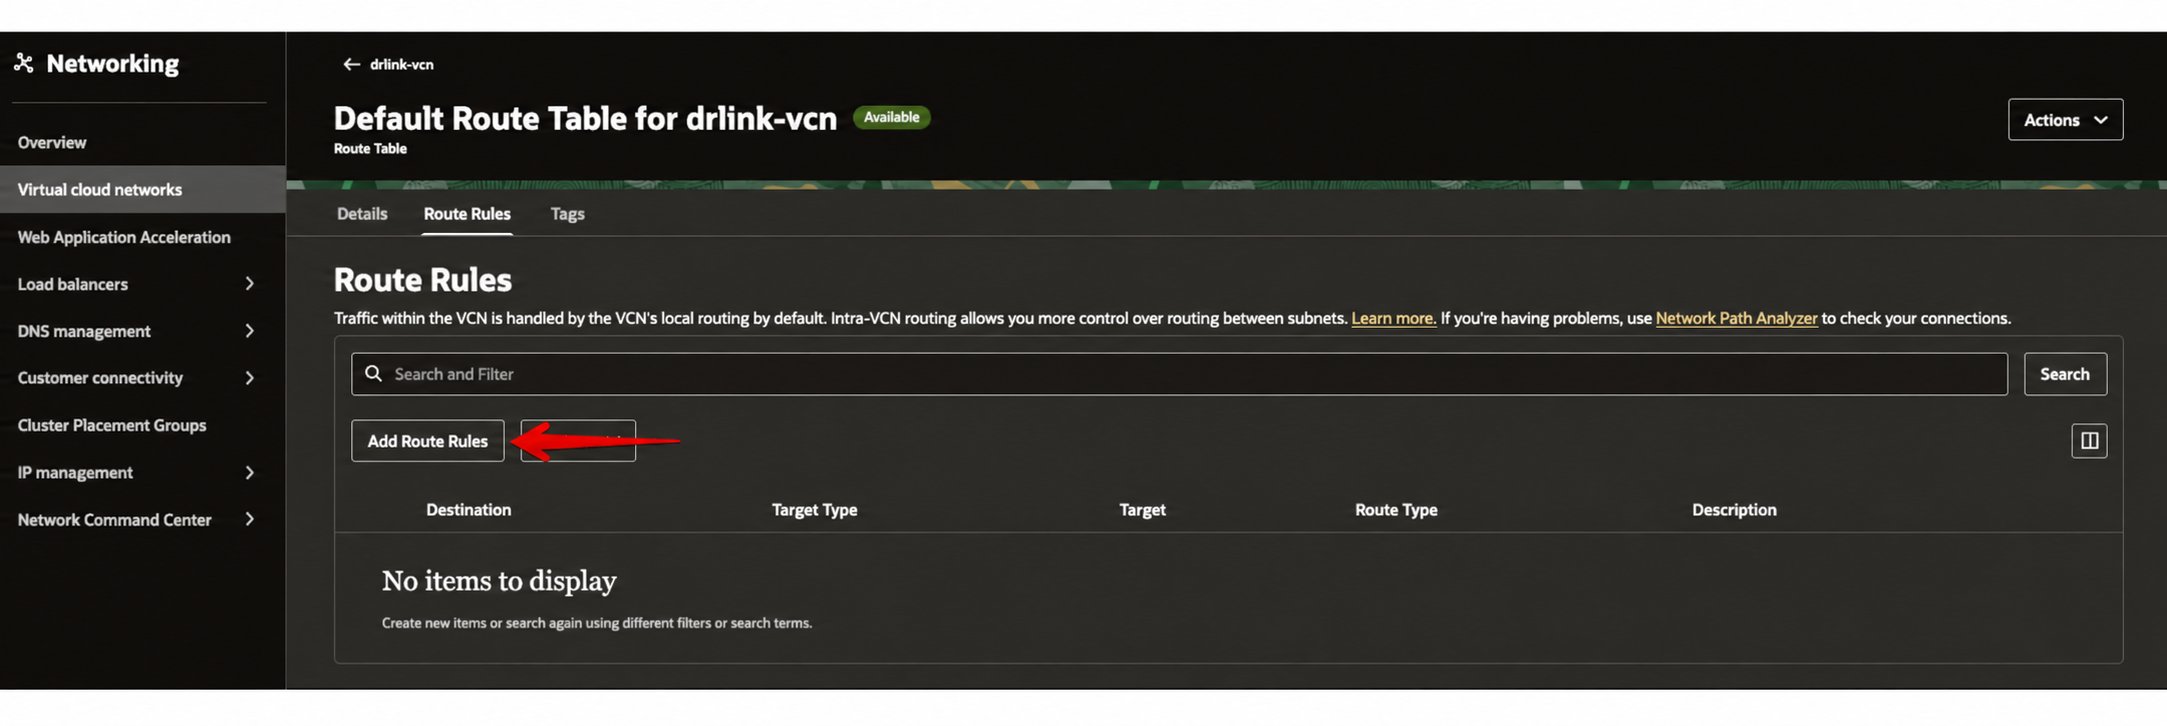
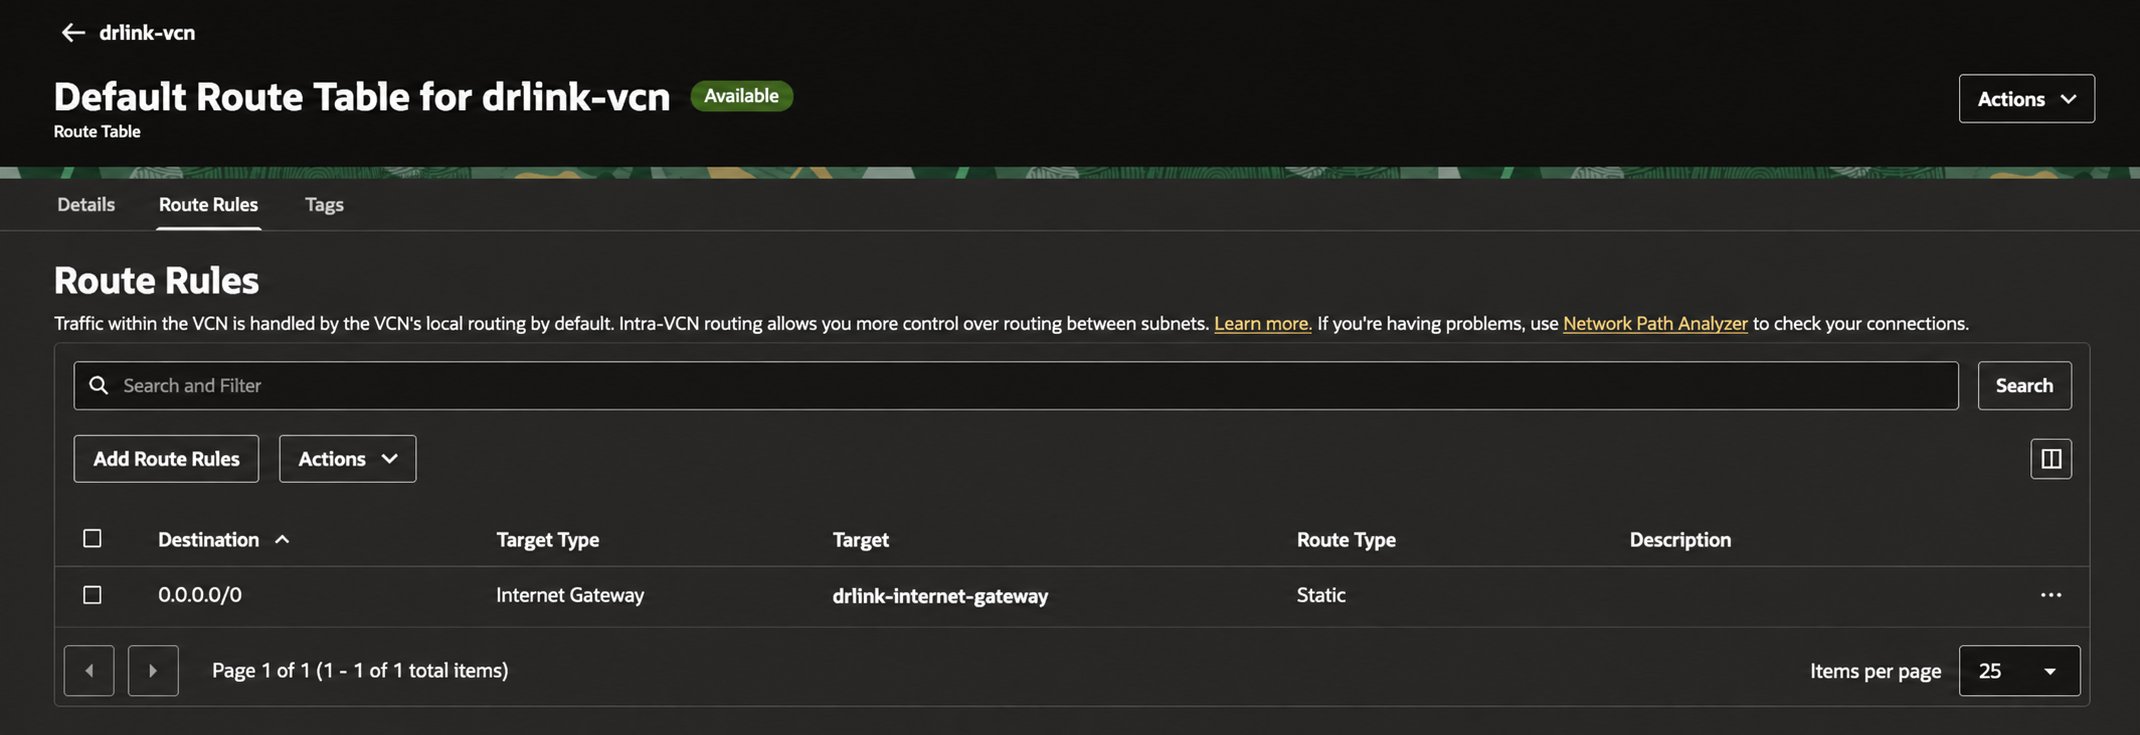
 **Route Rules → Add Route Rules**를 선택합니다.
 다음 값으로 인터넷 경로를 추가합니다.
```text theme={null}
Target Type Internet Gateway
Destination CIDR 0.0.0.0/0
Target data-relay-internet-gateway
```
다음 값으로 인터넷 경로를 추가합니다.
```text theme={null}
Target Type Internet Gateway
Destination CIDR 0.0.0.0/0
Target data-relay-internet-gateway
```
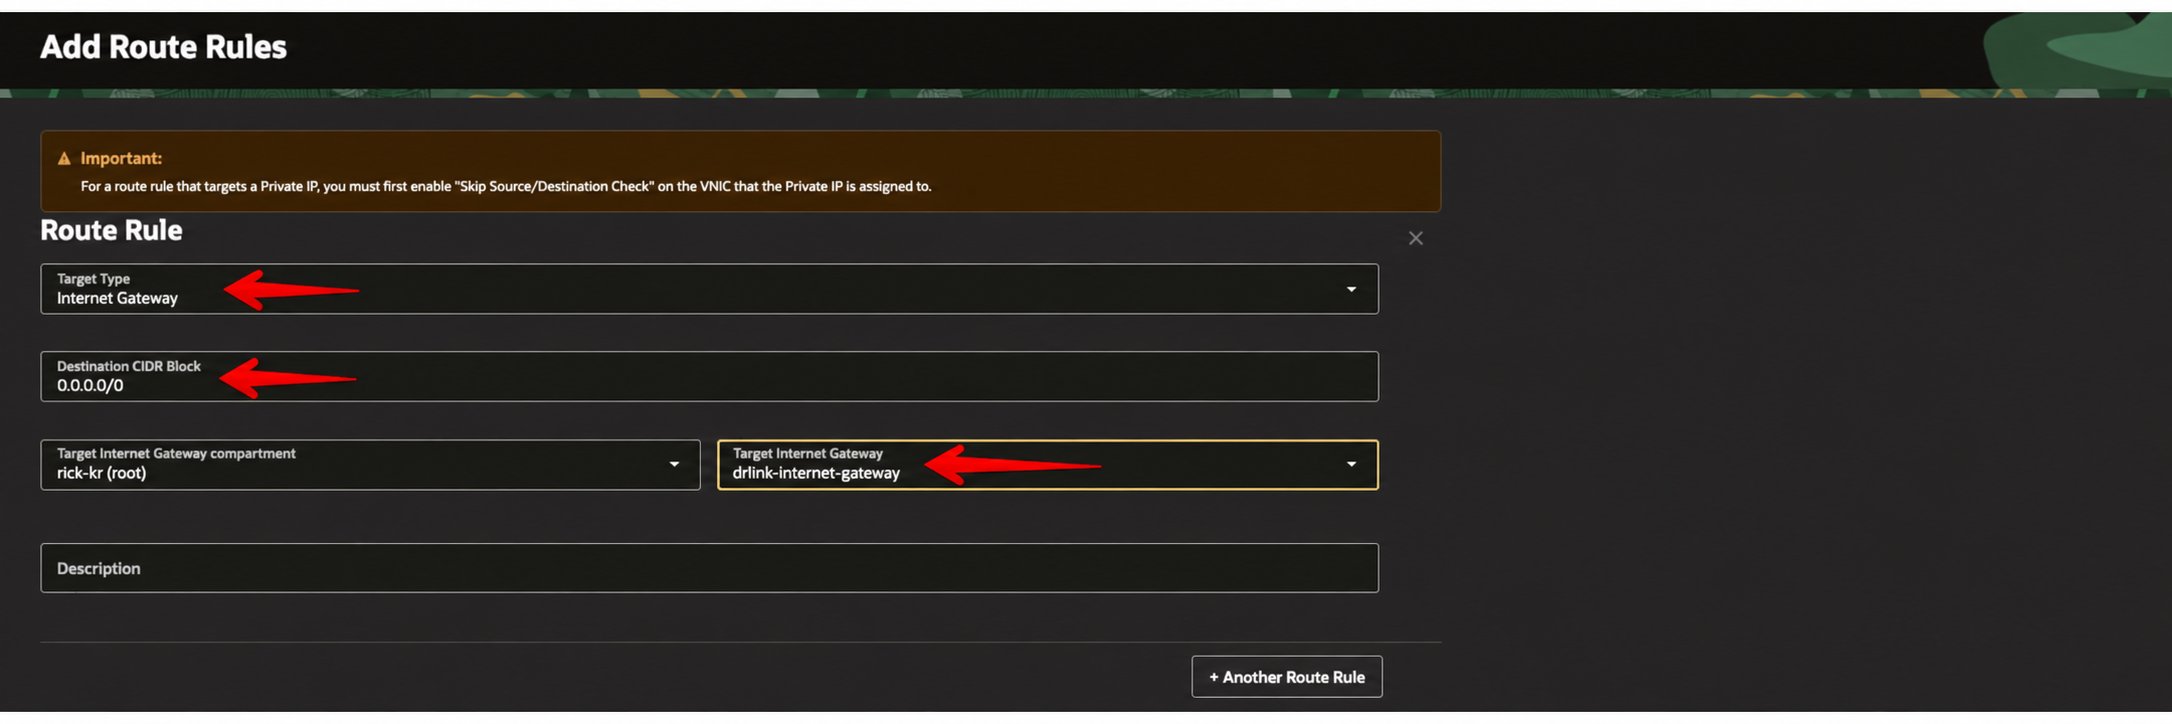 추가 후 Route Rule이 정상 반영되었는지 확인합니다.
 ### 2-4. Public Subnet 생성 시작
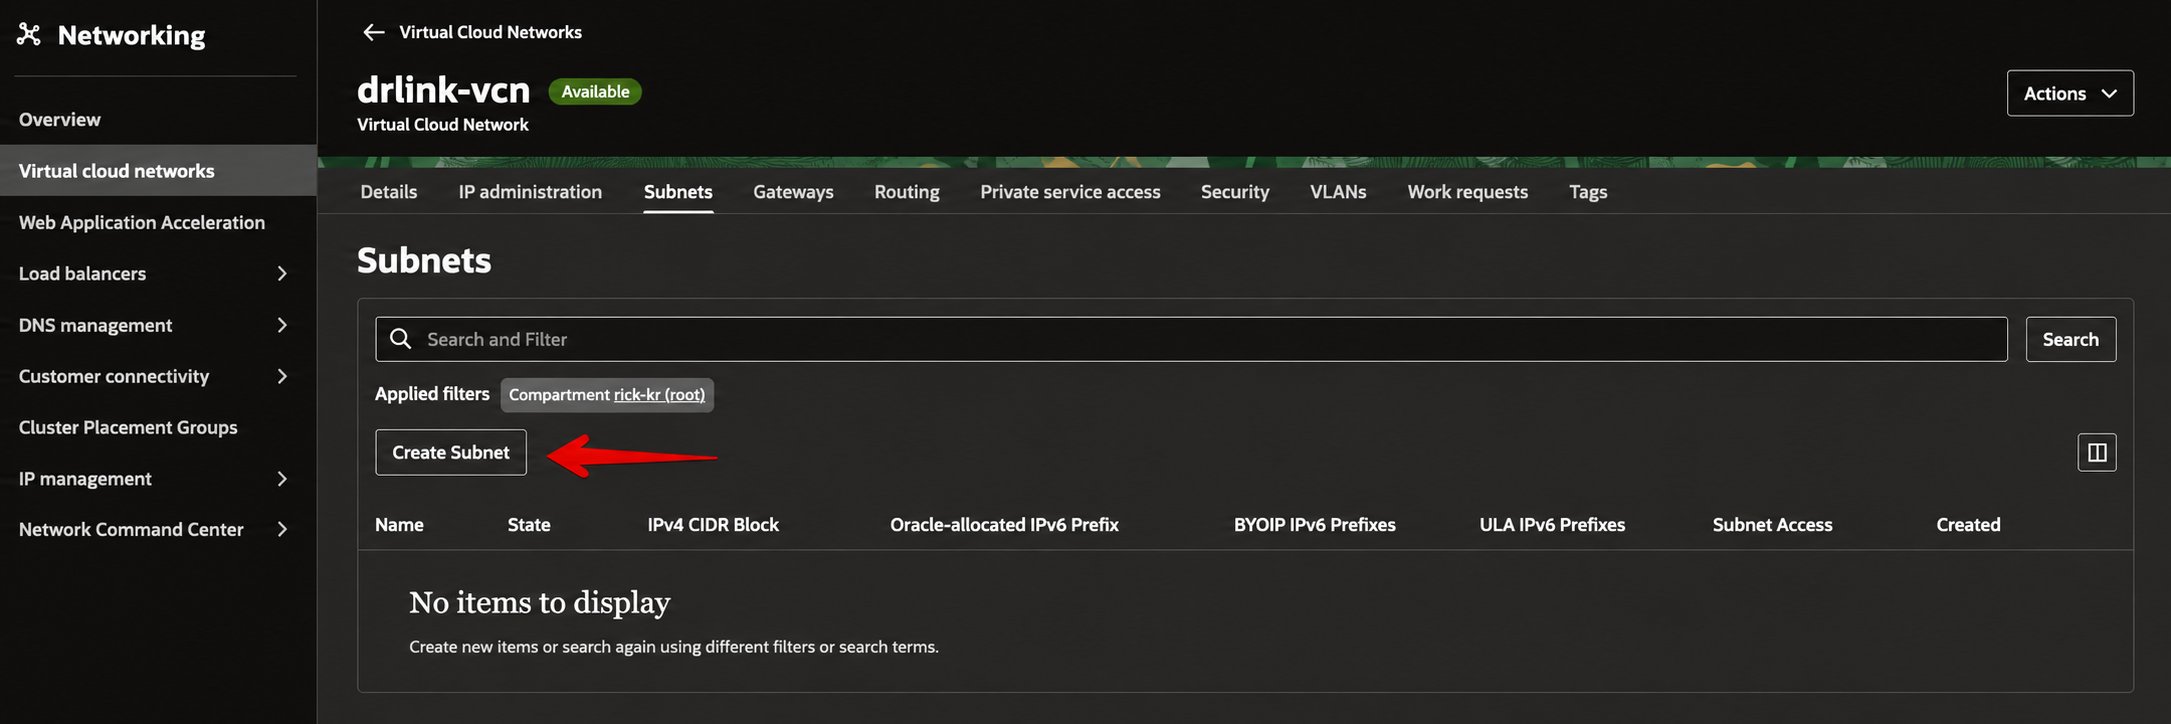
**Subnets** 탭에서 **Create Subnet**을 선택합니다.
### 2-4. Public Subnet 생성 시작
**Subnets** 탭에서 **Create Subnet**을 선택합니다.
 ### 2-5. Public Subnet 상세 설정
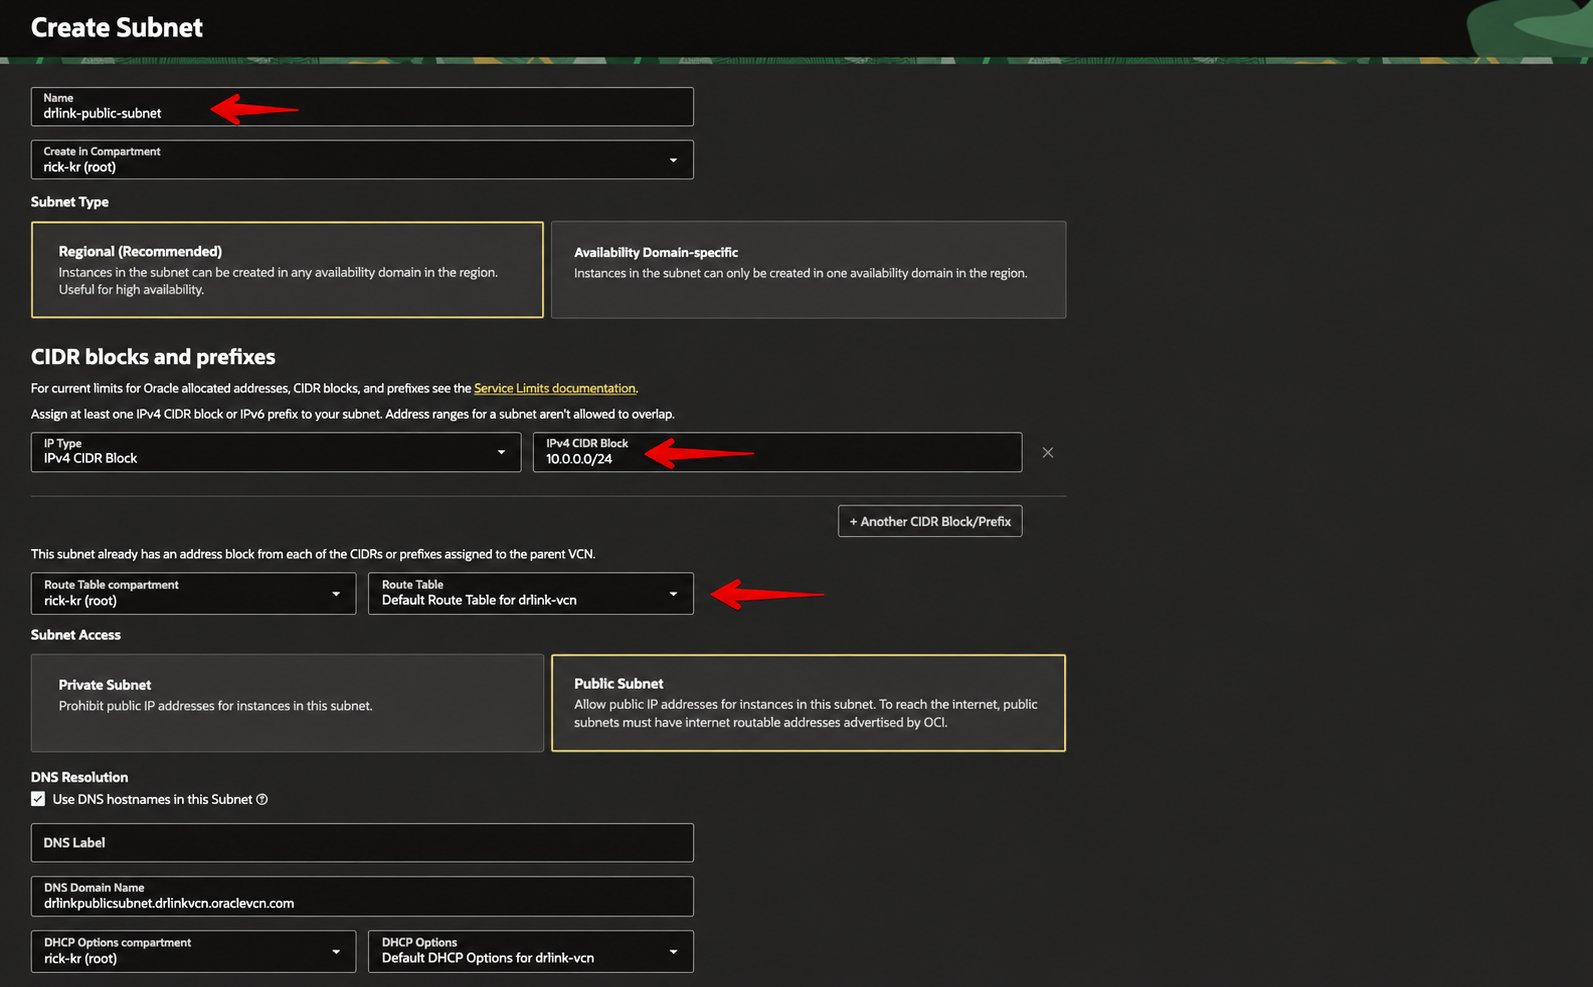
Public Subnet은 다음 값으로 생성합니다.
```text theme={null}
Name data-relay-public-subnet
Subnet Type Regional
IPv4 CIDR 10.0.0.0/24
Route Table Default Route Table for data-relay-vcn
Subnet Access Public Subnet
```
### 2-5. Public Subnet 상세 설정
Public Subnet은 다음 값으로 생성합니다.
```text theme={null}
Name data-relay-public-subnet
Subnet Type Regional
IPv4 CIDR 10.0.0.0/24
Route Table Default Route Table for data-relay-vcn
Subnet Access Public Subnet
```
 ### 2-6. Security List 설정
생성한 VCN의 **Security Lists** 메뉴로 이동합니다.
### 2-6. Security List 설정
생성한 VCN의 **Security Lists** 메뉴로 이동합니다.
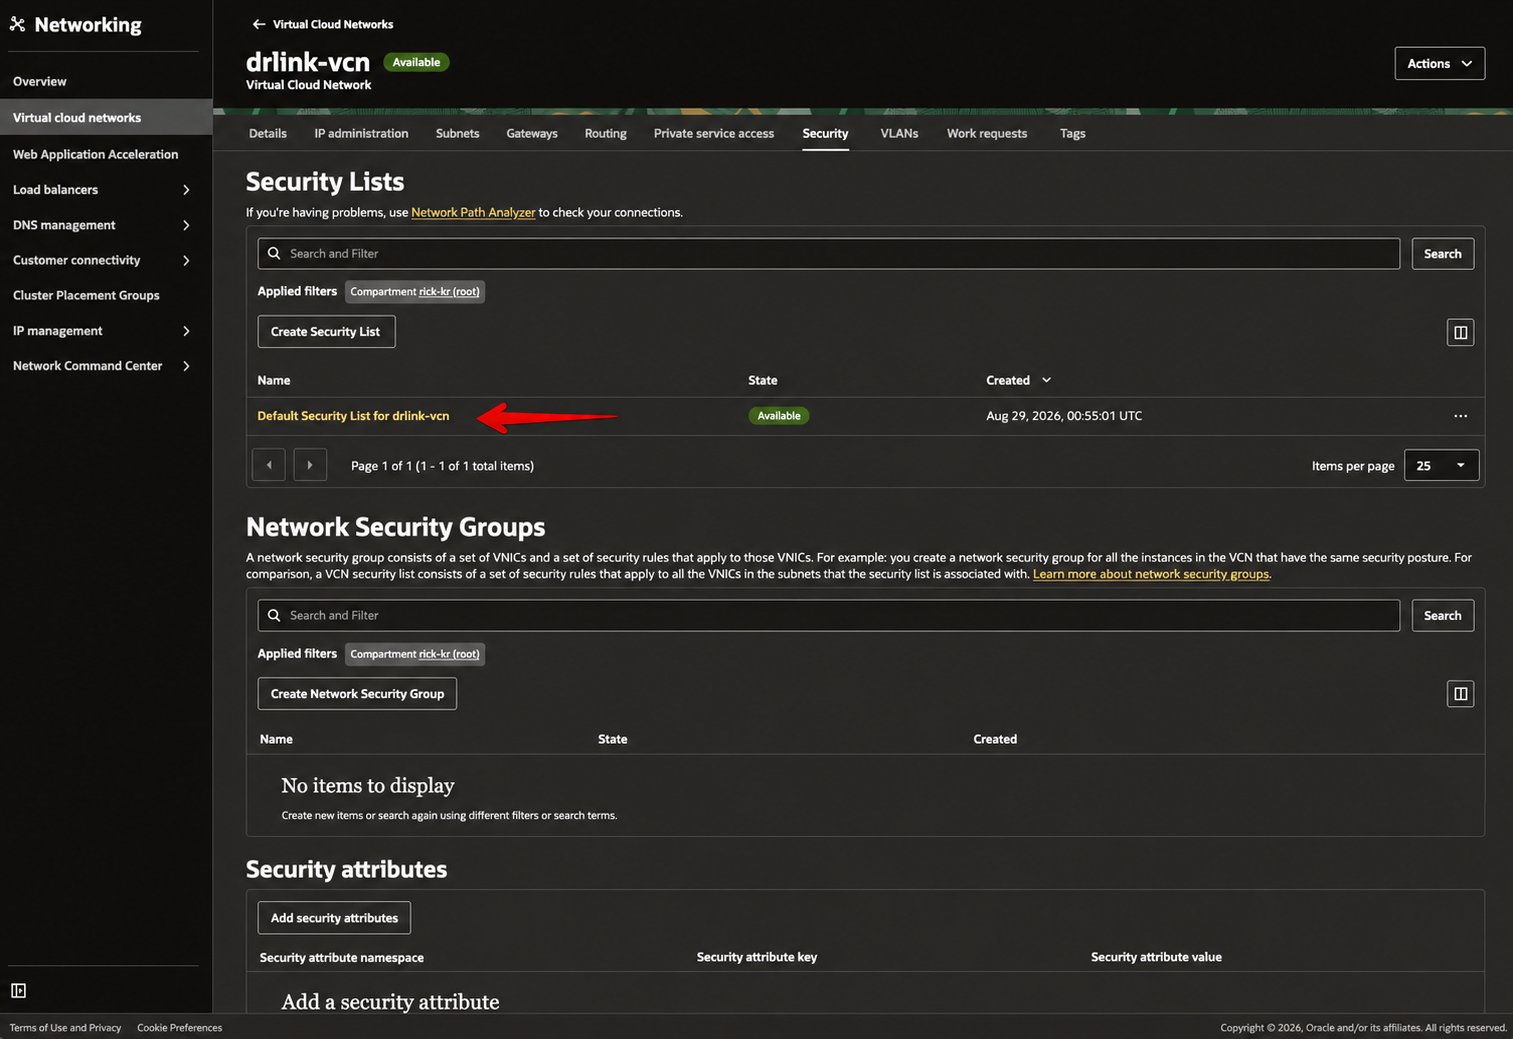 **Default Security List**의 Ingress Rules를 확인합니다.
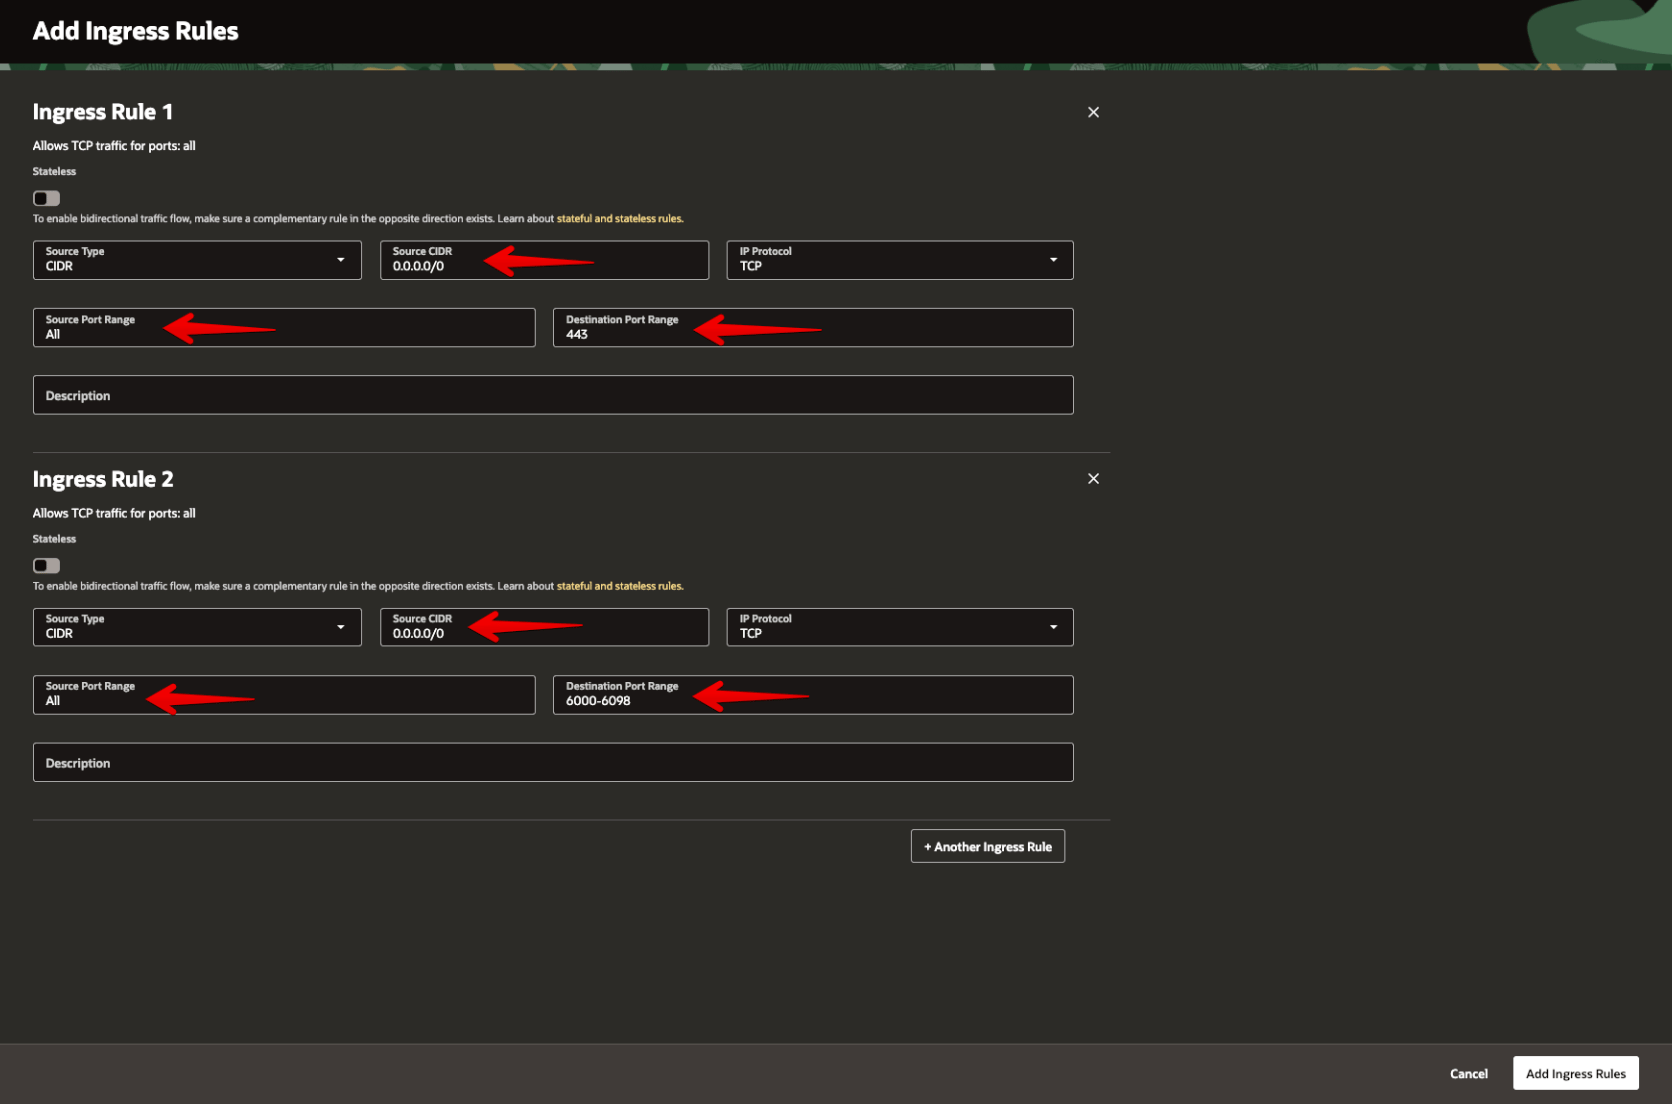
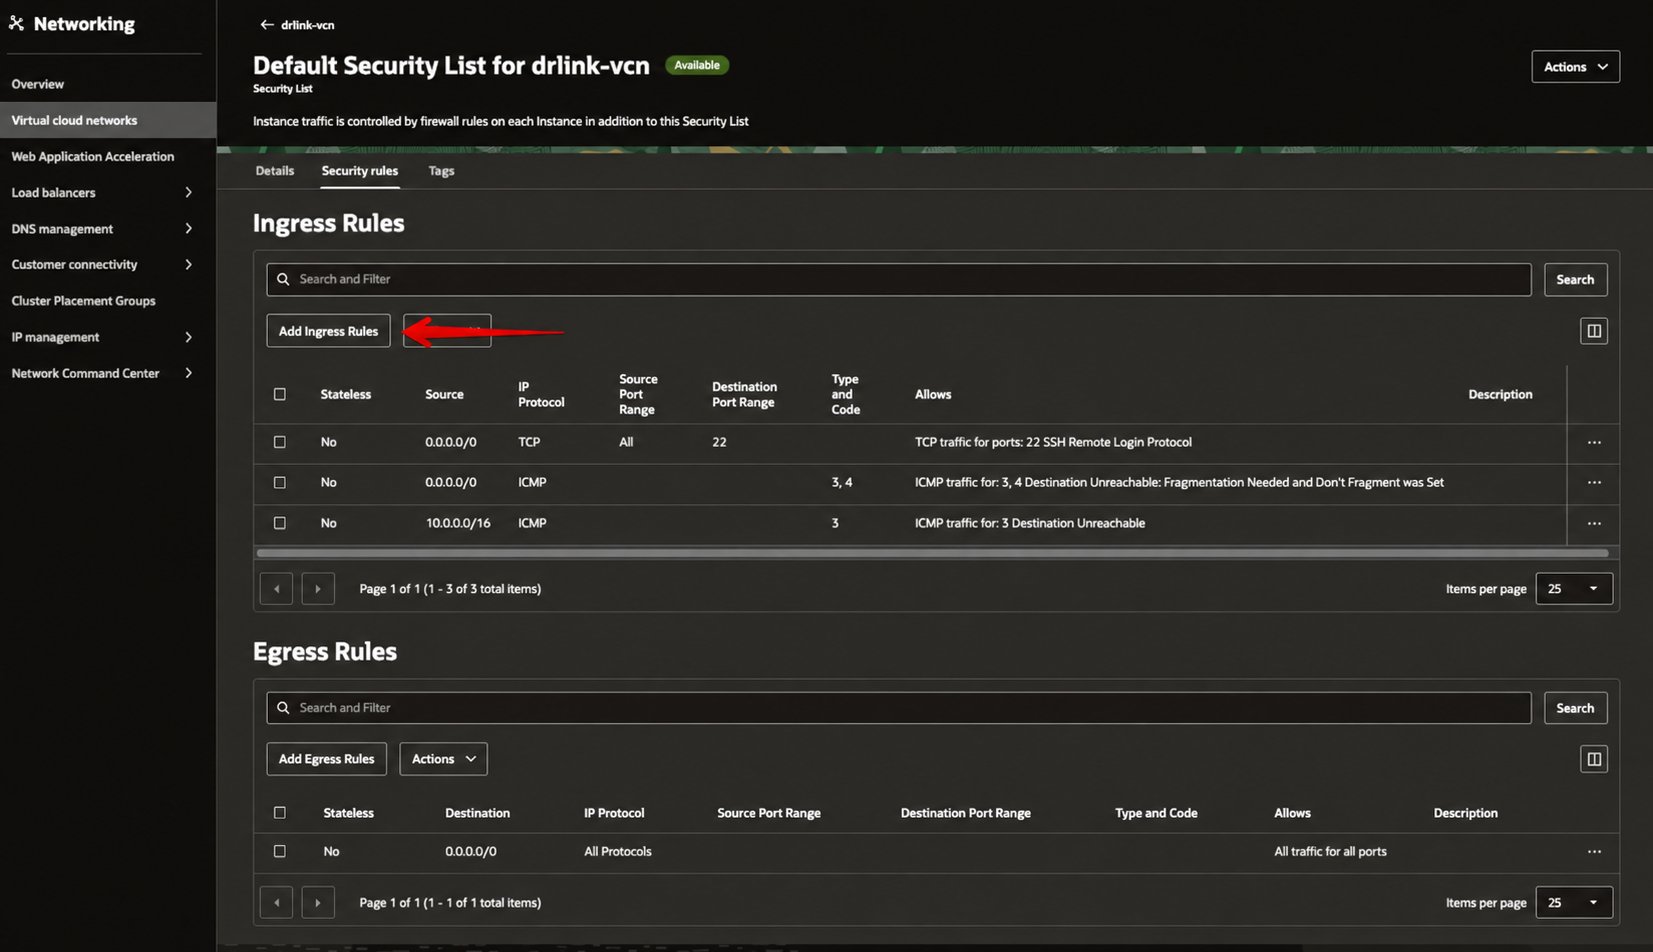 DataRelay Link single-443 기준으로 TCP 443과 Remote Service 범위인 TCP 6000-6098을 추가합니다. SSH 22는 기존 관리용 규칙을 유지하되 가능하면 관리자 공인 IP `/32`로 제한합니다.
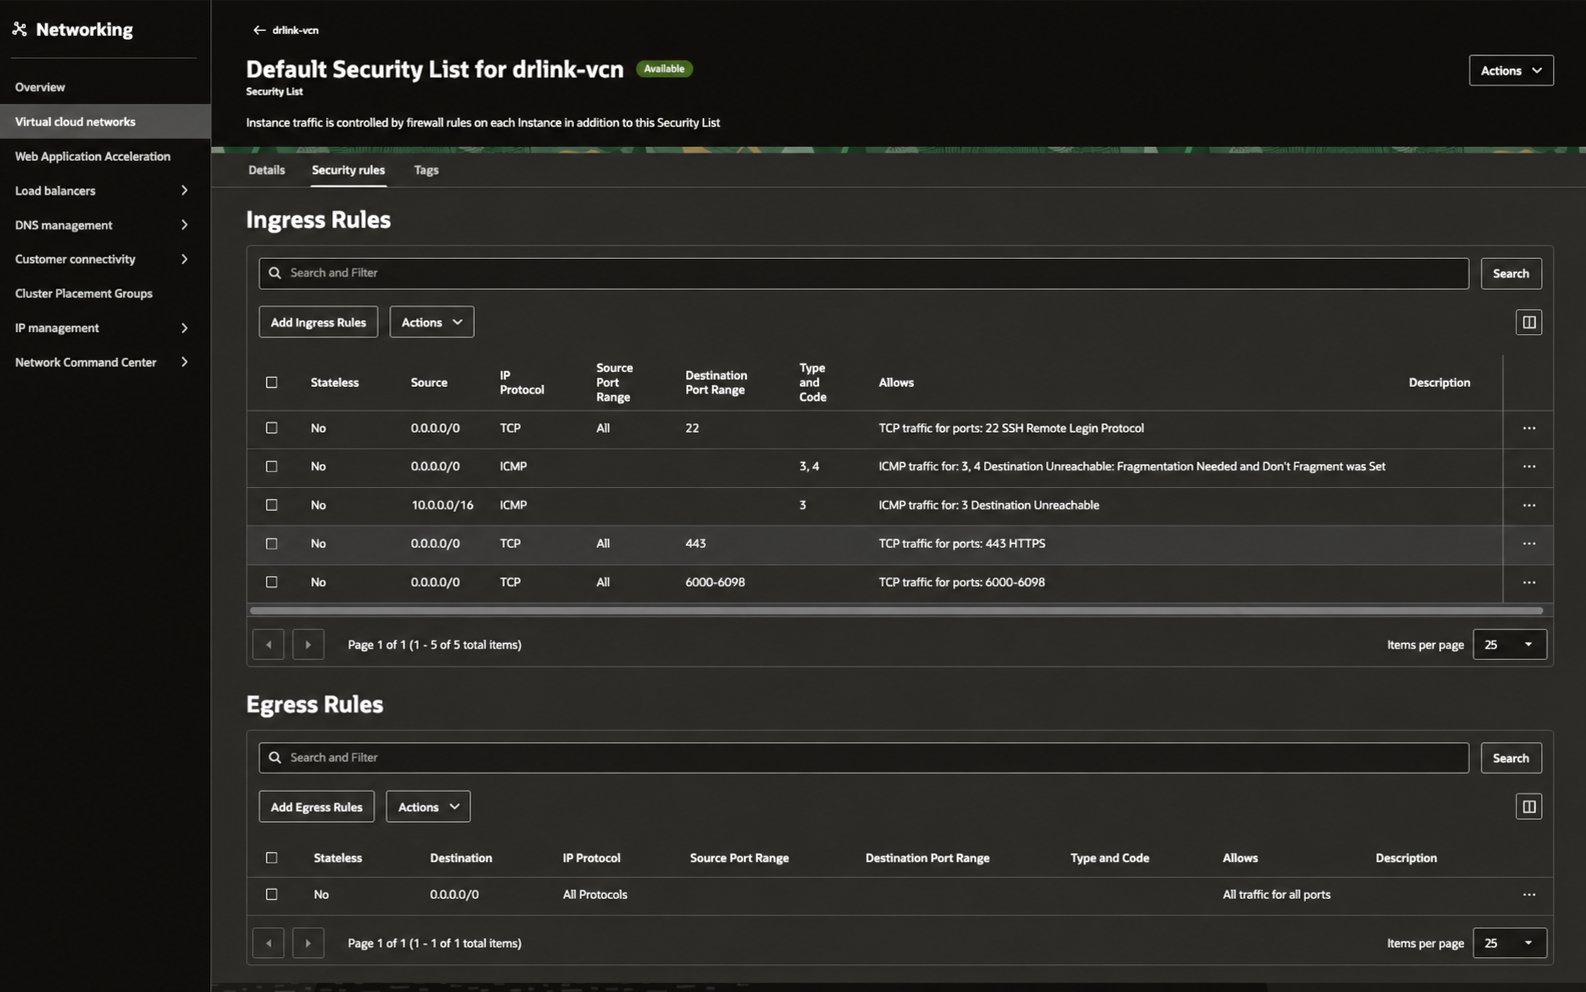
 추가 후 Ingress Rule이 정상 반영되었는지 확인합니다.
 ### single-443 권장 Ingress
| Protocol | Destination port | Source | 용도 |
| -------- | ---------------: | -------------------------------------- | ----------------------------------- |
| TCP | 22 | **관리자 공인 IP/32** | SSH 관리 |
| TCP | 443 | 필요한 Client network 또는 필요 시 `0.0.0.0/0` | WSS control + Enrollment/Management |
| TCP | 6000-6098 | 실제 서비스가 필요한 source | Remote Services |
**single-443에서는 6099와 7000을 OCI Public Ingress에 열지 않습니다.** 두 포트는 서버 내부 loopback backend입니다. 또한 다른 OCI 예제 화면의 `All Protocols` 규칙을 그대로 복사하지 말고 위 DataRelay Link용 최소 규칙을 사용하세요.
`6000-6098` 전체를 미리 열고 싶지 않다면 실제 배정된 서비스 포트만 열고 source CIDR도 제한할 수 있습니다.
## 3. Ubuntu Compute Instance 생성
이 가이드의 권장값:
```text theme={null}
Name data-relay-link-server
Image Canonical Ubuntu 24.04 LTS x86_64
Shape VM.Standard.E2.1.Micro (Console에서 Free/Eligible로 표시될 때)
VCN data-relay-vcn
Subnet data-relay-public-subnet
Boot volume 기본값
```
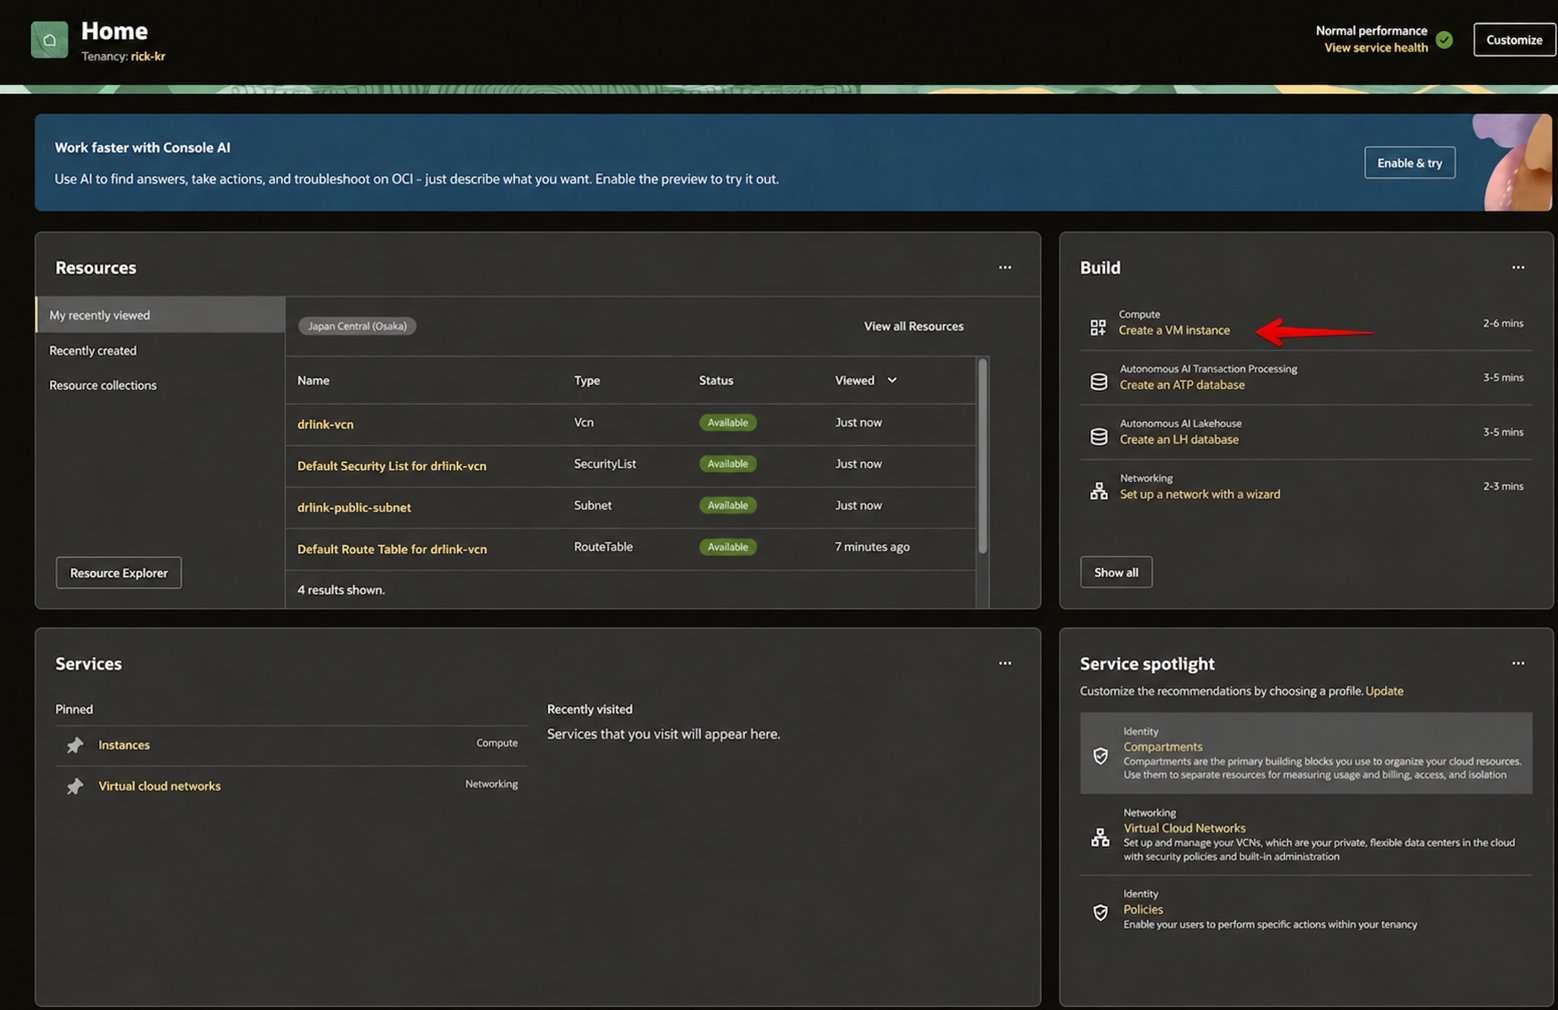
Compute Instance를 만들기 전에 앞에서 생성한 VCN, Internet Gateway, Route, Public Subnet, Security List가 준비되어 있는지 확인한 뒤 **Compute → Instances**로 이동합니다.
### single-443 권장 Ingress
| Protocol | Destination port | Source | 용도 |
| -------- | ---------------: | -------------------------------------- | ----------------------------------- |
| TCP | 22 | **관리자 공인 IP/32** | SSH 관리 |
| TCP | 443 | 필요한 Client network 또는 필요 시 `0.0.0.0/0` | WSS control + Enrollment/Management |
| TCP | 6000-6098 | 실제 서비스가 필요한 source | Remote Services |
**single-443에서는 6099와 7000을 OCI Public Ingress에 열지 않습니다.** 두 포트는 서버 내부 loopback backend입니다. 또한 다른 OCI 예제 화면의 `All Protocols` 규칙을 그대로 복사하지 말고 위 DataRelay Link용 최소 규칙을 사용하세요.
`6000-6098` 전체를 미리 열고 싶지 않다면 실제 배정된 서비스 포트만 열고 source CIDR도 제한할 수 있습니다.
## 3. Ubuntu Compute Instance 생성
이 가이드의 권장값:
```text theme={null}
Name data-relay-link-server
Image Canonical Ubuntu 24.04 LTS x86_64
Shape VM.Standard.E2.1.Micro (Console에서 Free/Eligible로 표시될 때)
VCN data-relay-vcn
Subnet data-relay-public-subnet
Boot volume 기본값
```
Compute Instance를 만들기 전에 앞에서 생성한 VCN, Internet Gateway, Route, Public Subnet, Security List가 준비되어 있는지 확인한 뒤 **Compute → Instances**로 이동합니다.
 ### 3-1. Compute Instance 기본 정보
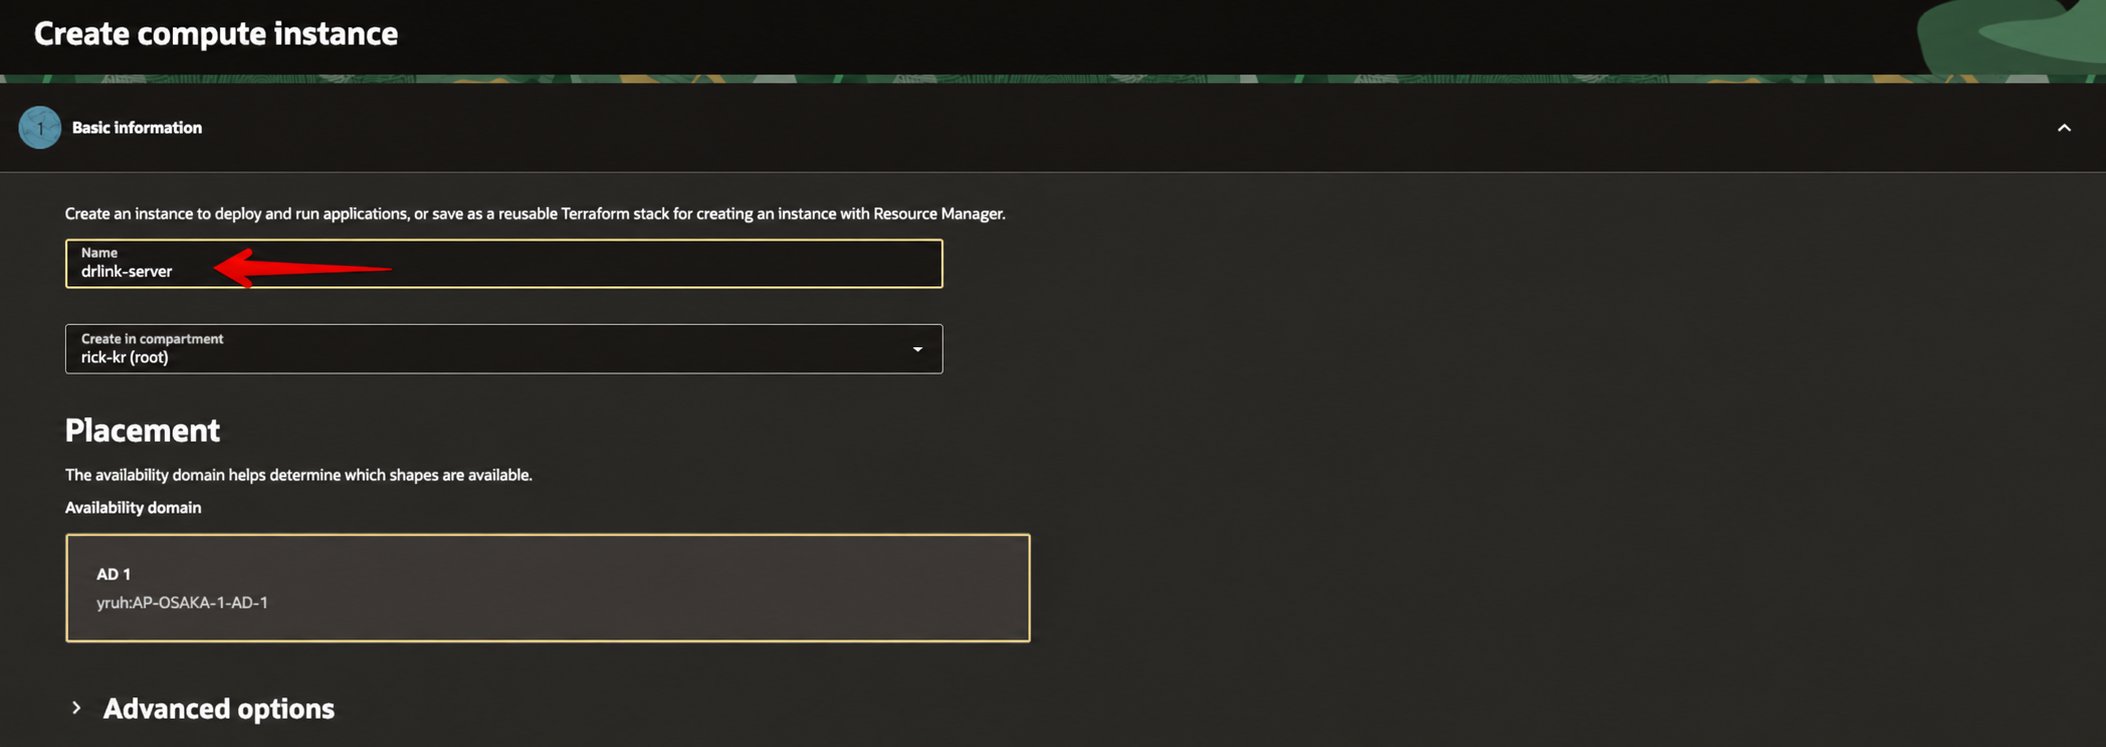
**Create compute instance** 화면에서 이름과 placement를 확인합니다.
### 3-1. Compute Instance 기본 정보
**Create compute instance** 화면에서 이름과 placement를 확인합니다.
 ### 3-2. Canonical Ubuntu 24.04 선택
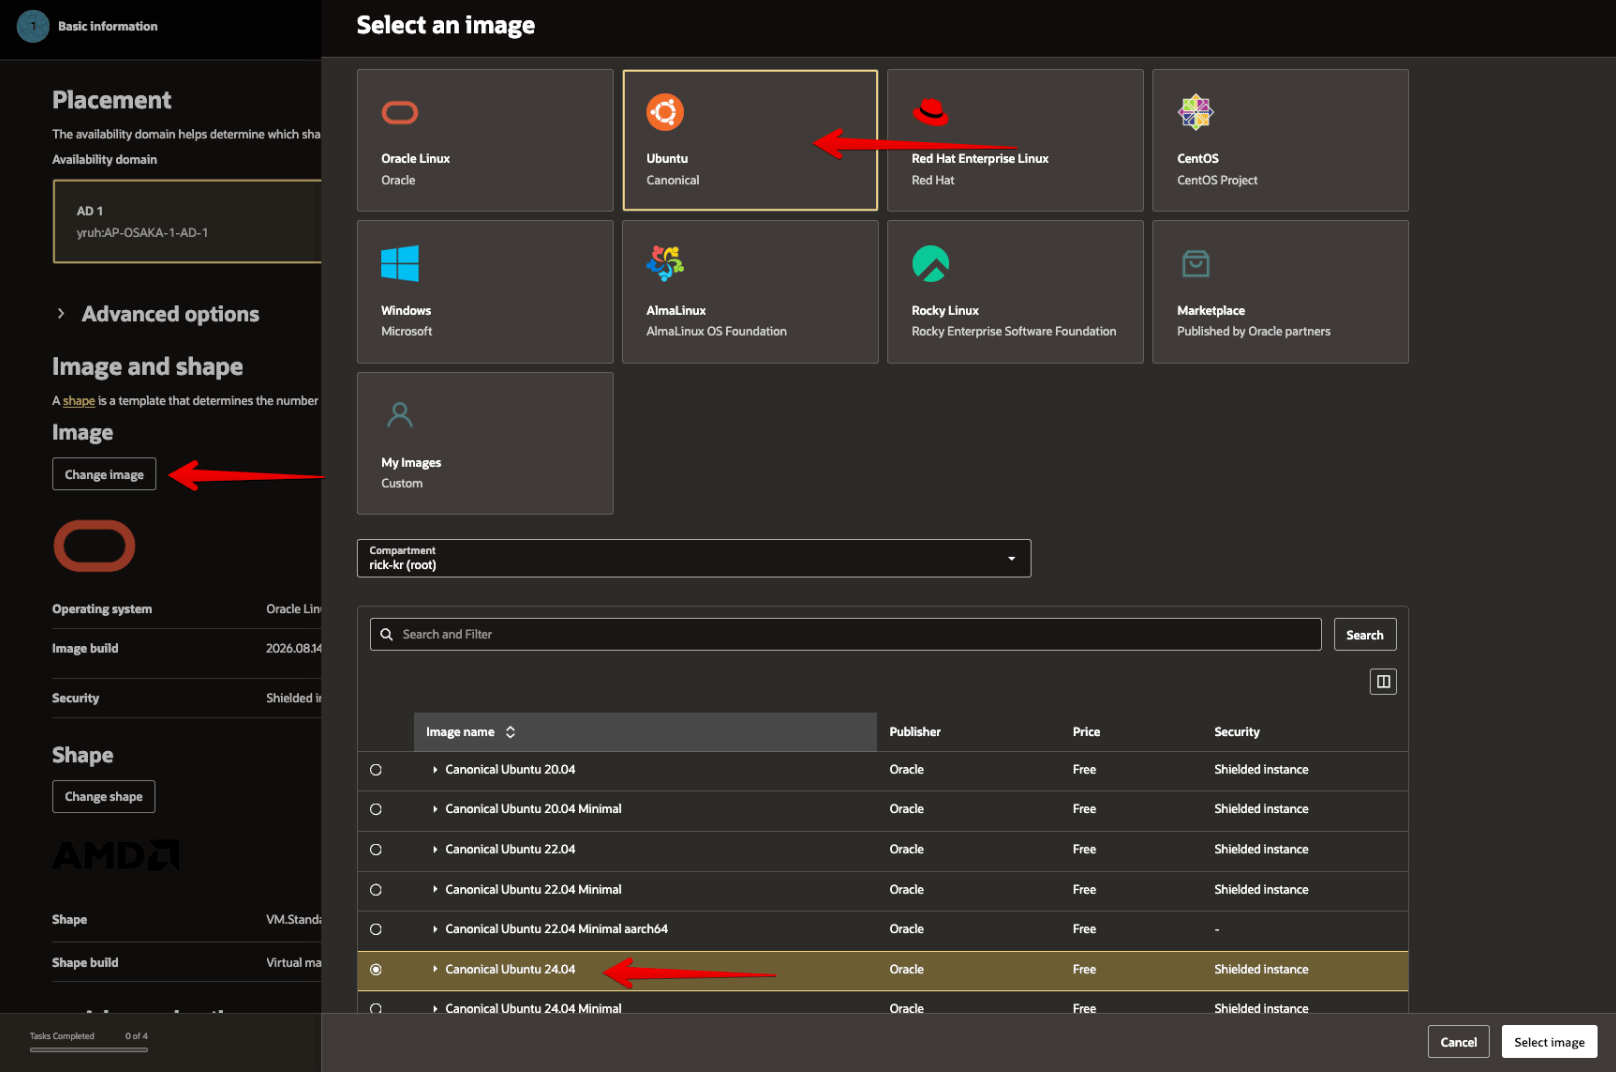
**Change image**를 눌러 Canonical Ubuntu 24.04 이미지를 선택합니다. 이미지/버전은 OCI Console의 현재 표시를 최종 기준으로 확인하세요.
### 3-2. Canonical Ubuntu 24.04 선택
**Change image**를 눌러 Canonical Ubuntu 24.04 이미지를 선택합니다. 이미지/버전은 OCI Console의 현재 표시를 최종 기준으로 확인하세요.
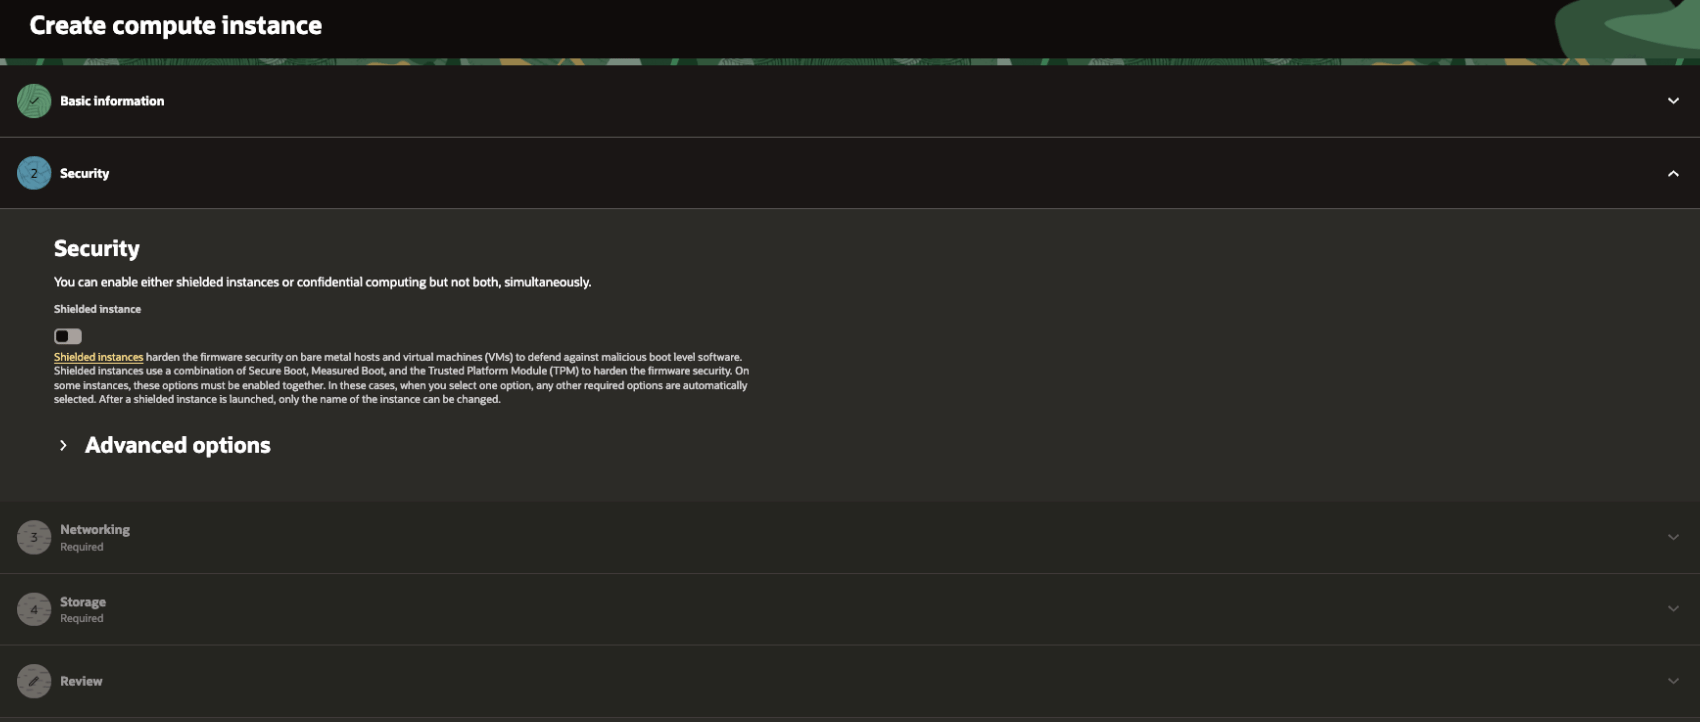
 Security 설정은 별도 요구가 없다면 기본값을 사용합니다.
 ### 3-3. VCN과 Public Subnet 선택
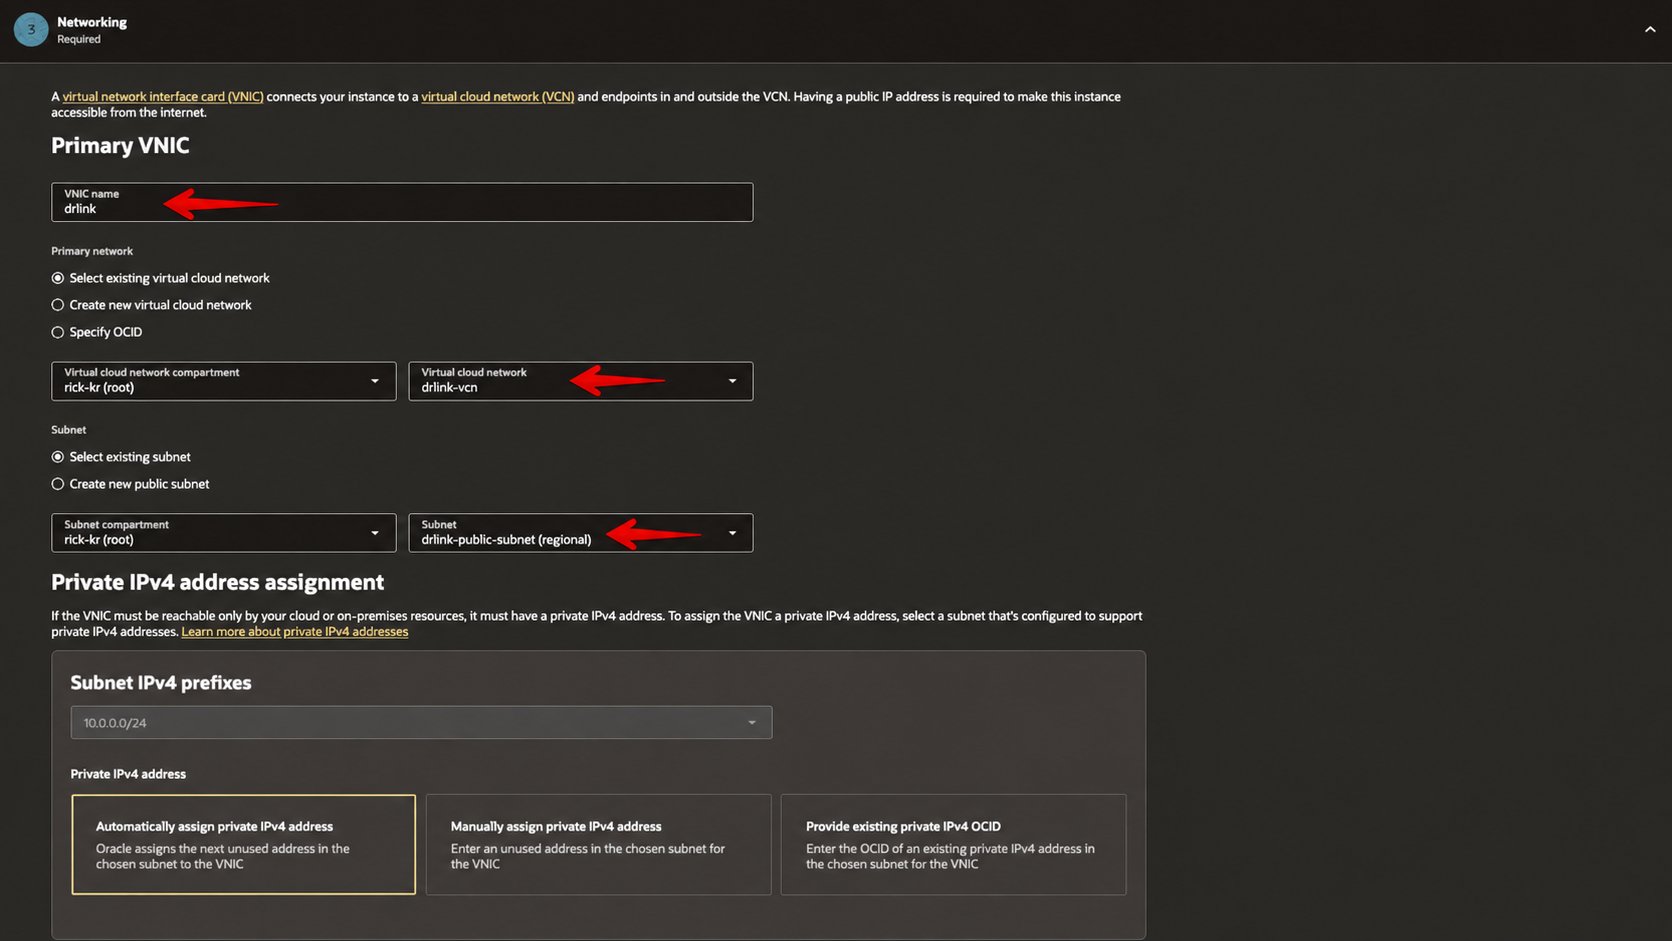
Primary VNIC에서 앞에서 만든 `data-relay-vcn`과 `data-relay-public-subnet`을 각각 선택합니다.
### 3-3. VCN과 Public Subnet 선택
Primary VNIC에서 앞에서 만든 `data-relay-vcn`과 `data-relay-public-subnet`을 각각 선택합니다.
 ### 3-4. Public IPv4 자동할당 해제 및 SSH Key 설정
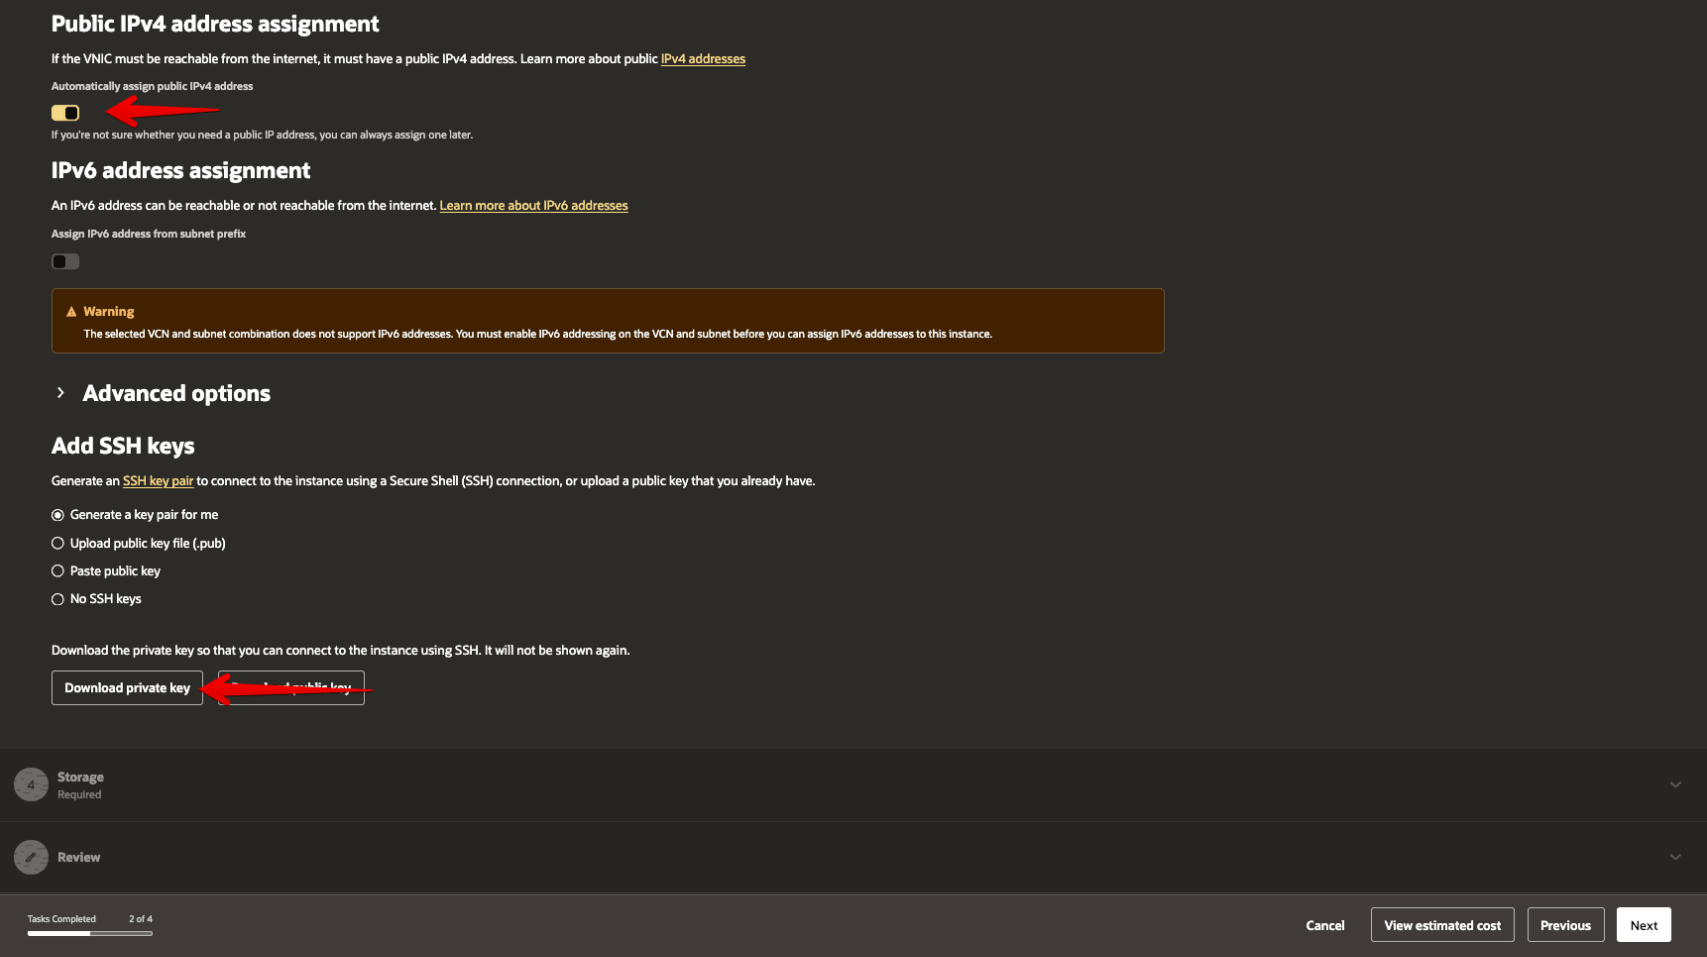
최종적으로 Reserved Public IP를 사용할 것이므로 **Automatically assign public IPv4 address**는 끕니다. 이어서 기존 SSH public key를 넣거나 OCI에서 새 key pair를 생성하고 private key를 안전하게 보관합니다.
### 3-4. Public IPv4 자동할당 해제 및 SSH Key 설정
최종적으로 Reserved Public IP를 사용할 것이므로 **Automatically assign public IPv4 address**는 끕니다. 이어서 기존 SSH public key를 넣거나 OCI에서 새 key pair를 생성하고 private key를 안전하게 보관합니다.
 ### 3-5. Boot Volume 확인
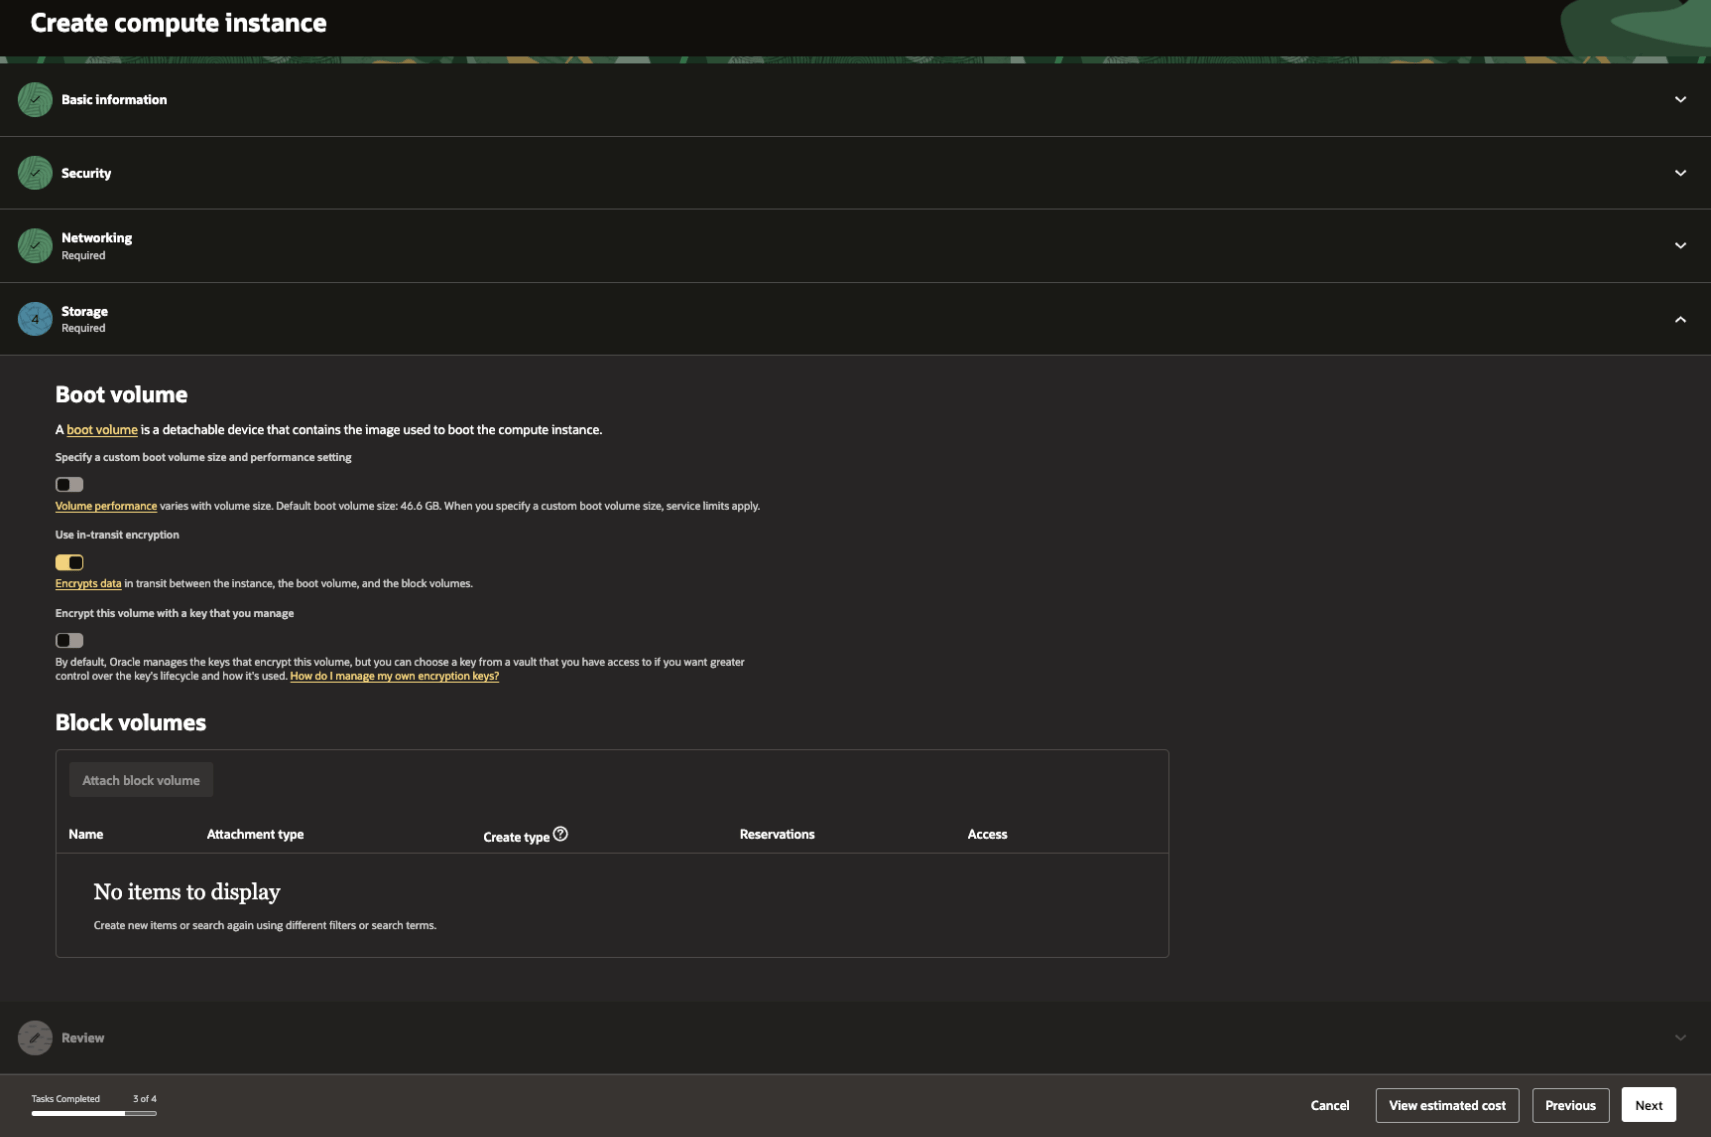
별도 스토리지 요구사항이 없다면 Boot Volume은 기본값을 사용합니다.
### 3-5. Boot Volume 확인
별도 스토리지 요구사항이 없다면 Boot Volume은 기본값을 사용합니다.
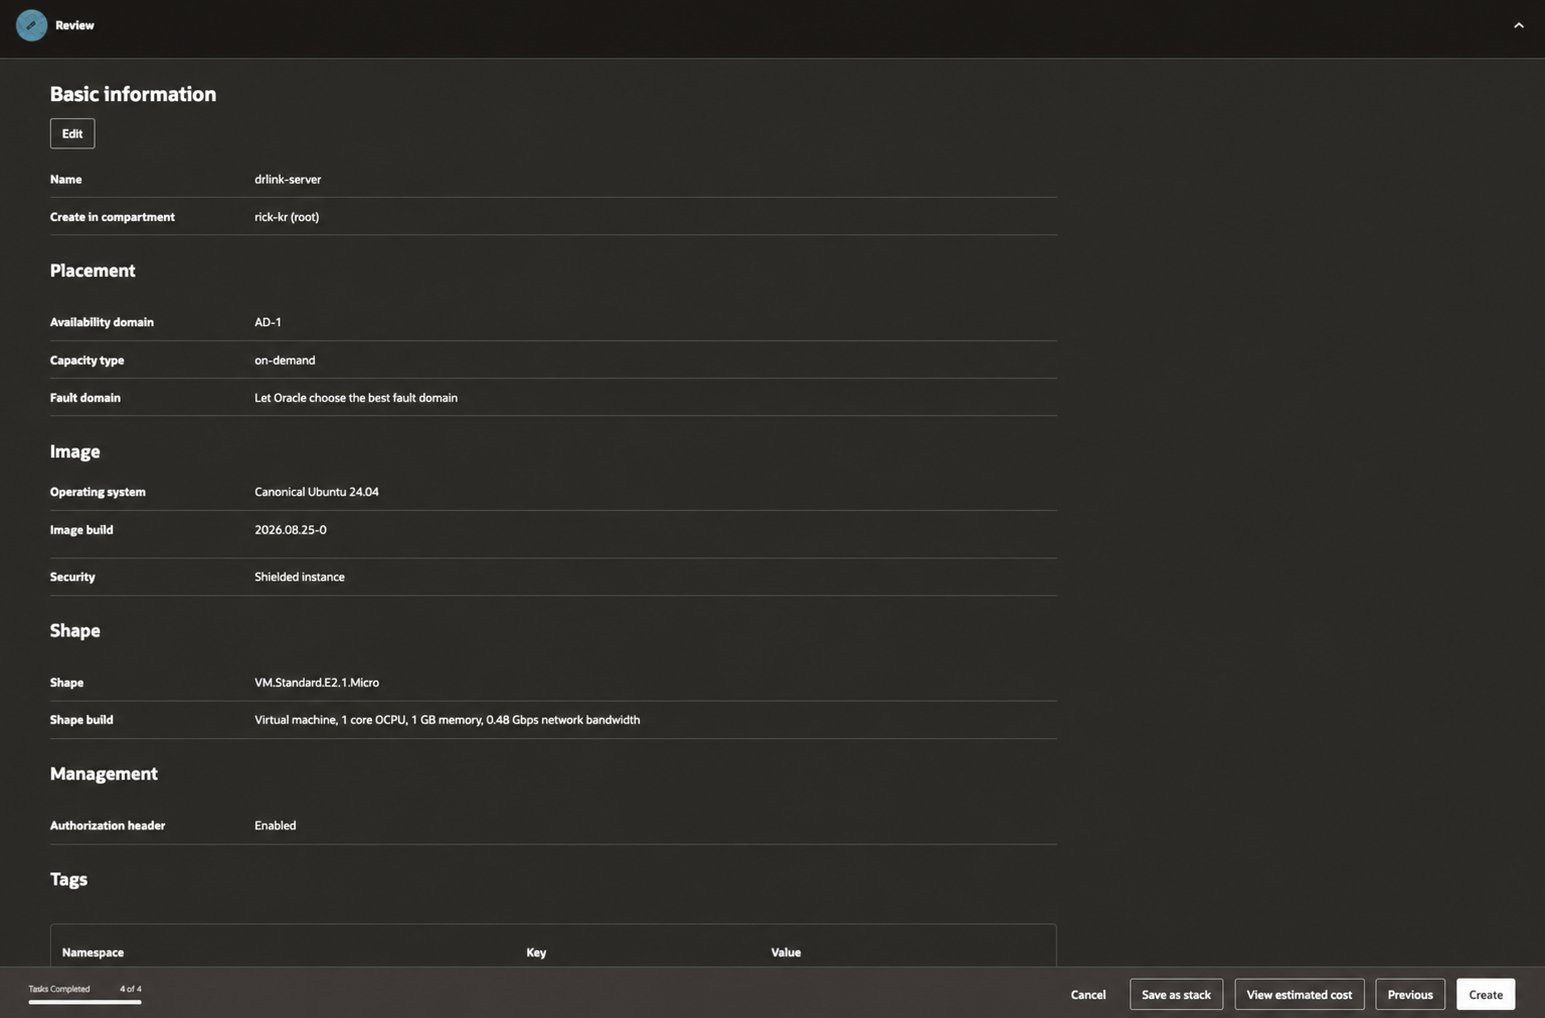
 ### 3-6. Instance 생성 전 Review
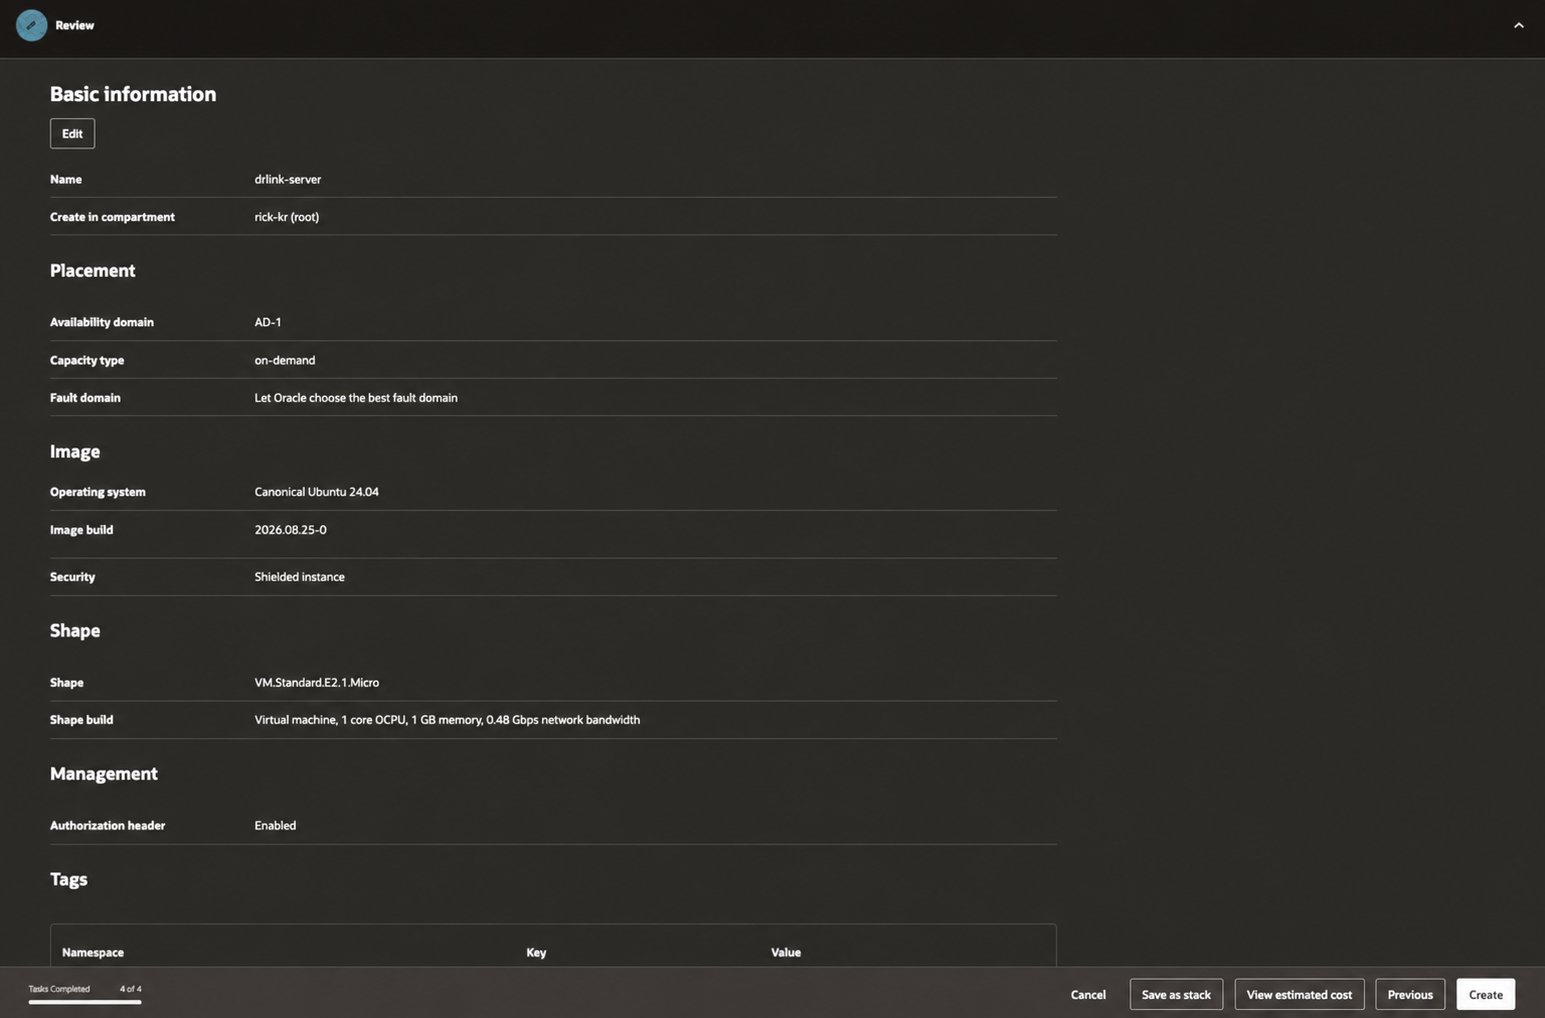
Image가 Ubuntu 24.04이고 Shape, VCN/Subnet, SSH Key가 의도한 값인지 확인한 뒤 Instance를 생성합니다.
### 3-6. Instance 생성 전 Review
Image가 Ubuntu 24.04이고 Shape, VCN/Subnet, SSH Key가 의도한 값인지 확인한 뒤 Instance를 생성합니다.
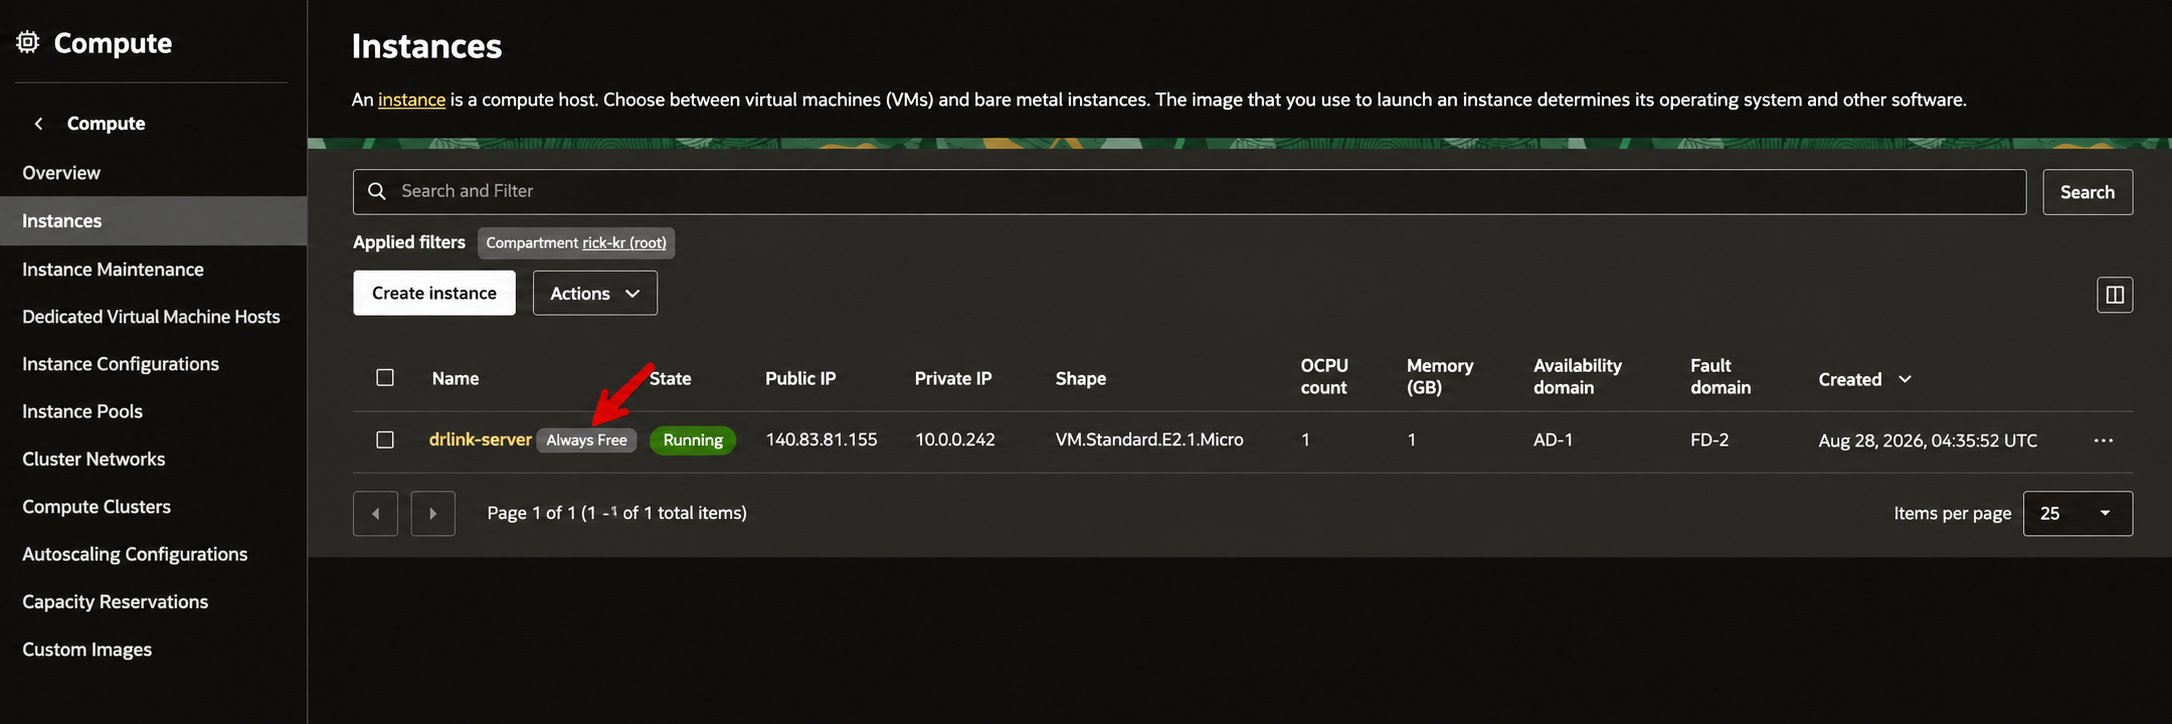
 ### 3-7. 생성된 Instance 및 Free/Eligible 표시 확인
Instance 목록에서 생성 상태를 확인합니다.
### 3-7. 생성된 Instance 및 Free/Eligible 표시 확인
Instance 목록에서 생성 상태를 확인합니다.
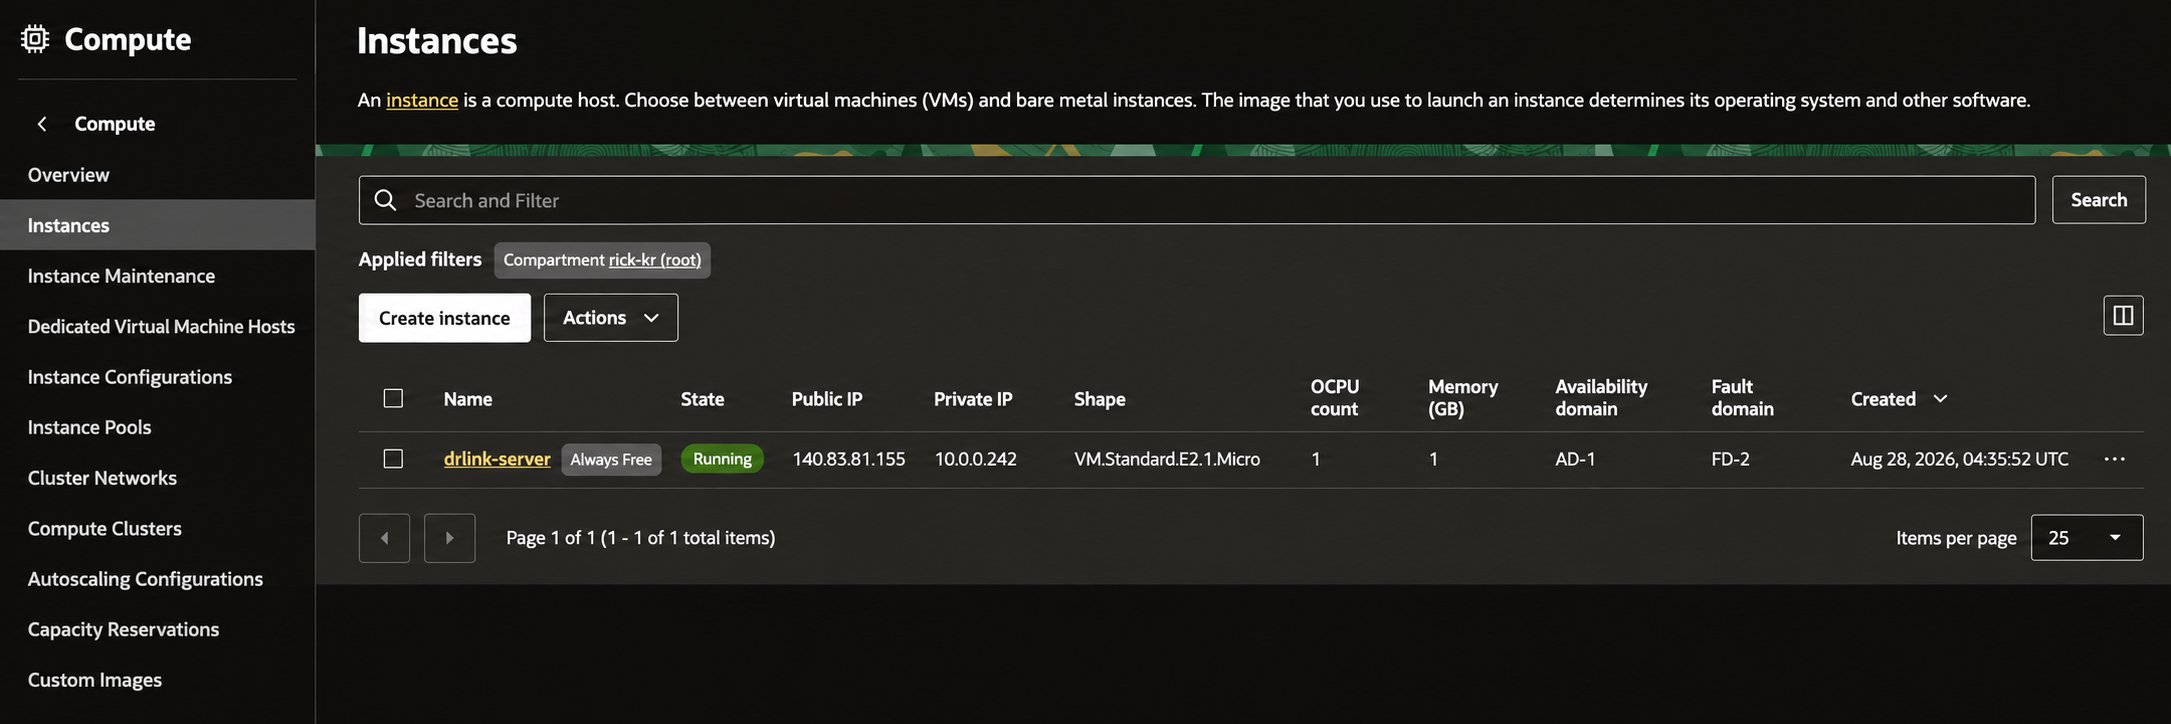 기존 화면의 **Always Free** 표시는 당시 OCI Console의 예시입니다. 현재 Free Tier/Eligible 여부는 리전과 tenancy 정책에 따라 달라질 수 있으므로 현재 Console의 비용/자격 표시를 최종 기준으로 확인하세요.
 중요한 부분은 다음입니다.
* 기존 `data-relay-vcn` 선택
* `data-relay-public-subnet` 선택
* Private IPv4는 자동 할당
* 최종 고정 IP 구성을 위해 **Automatically assign public IPv4 address를 끔**
* 기존 SSH public key를 넣거나 OCI에서 새 key pair 생성
* OCI가 key를 생성했다면 private key를 즉시 안전하게 보관
* 별도 요구가 없다면 Boot Volume은 기본값 유지
`VM.Standard.E2.1.Micro`가 실제로 무료인지와 생성 가능한지는 리전/tenancy 상태에 따라 달라집니다. 생성 화면에서 Eligible/비용 표시가 다르면 이 문서만 보고 무료라고 가정하지 마세요.
## 4. Reserved Public IPv4 연결
Instance 상세 화면에서 **Networking → Primary VNIC**로 이동합니다.
중요한 부분은 다음입니다.
* 기존 `data-relay-vcn` 선택
* `data-relay-public-subnet` 선택
* Private IPv4는 자동 할당
* 최종 고정 IP 구성을 위해 **Automatically assign public IPv4 address를 끔**
* 기존 SSH public key를 넣거나 OCI에서 새 key pair 생성
* OCI가 key를 생성했다면 private key를 즉시 안전하게 보관
* 별도 요구가 없다면 Boot Volume은 기본값 유지
`VM.Standard.E2.1.Micro`가 실제로 무료인지와 생성 가능한지는 리전/tenancy 상태에 따라 달라집니다. 생성 화면에서 Eligible/비용 표시가 다르면 이 문서만 보고 무료라고 가정하지 마세요.
## 4. Reserved Public IPv4 연결
Instance 상세 화면에서 **Networking → Primary VNIC**로 이동합니다.
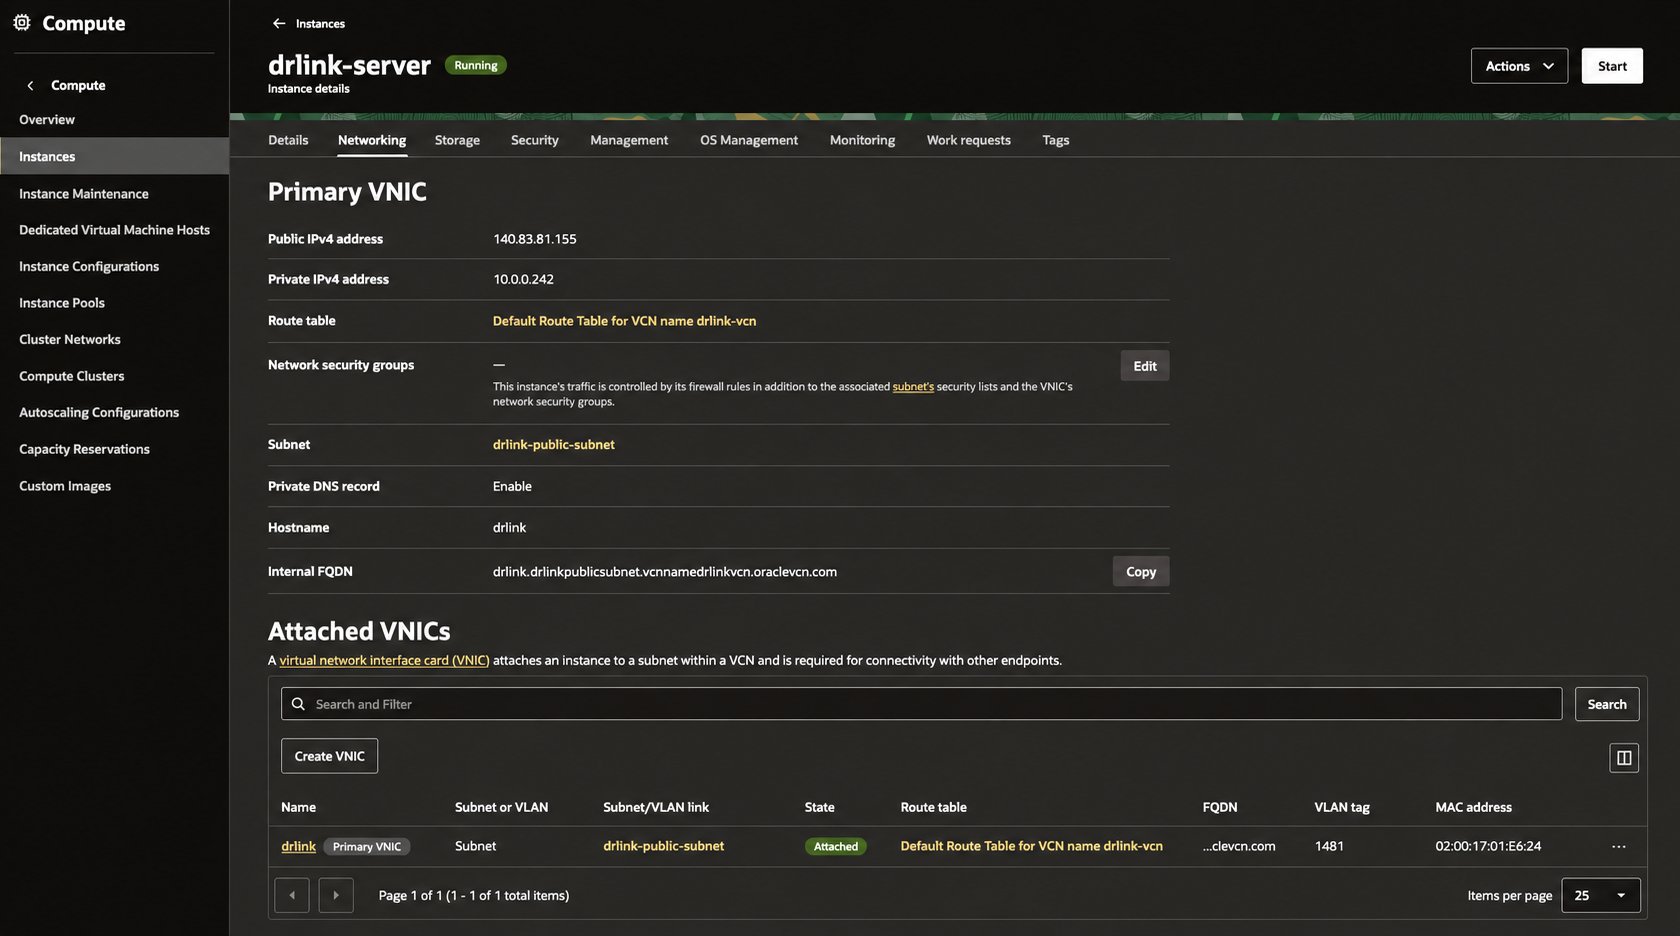 VNIC에서 **IP administration → Primary Private IP**를 선택합니다.
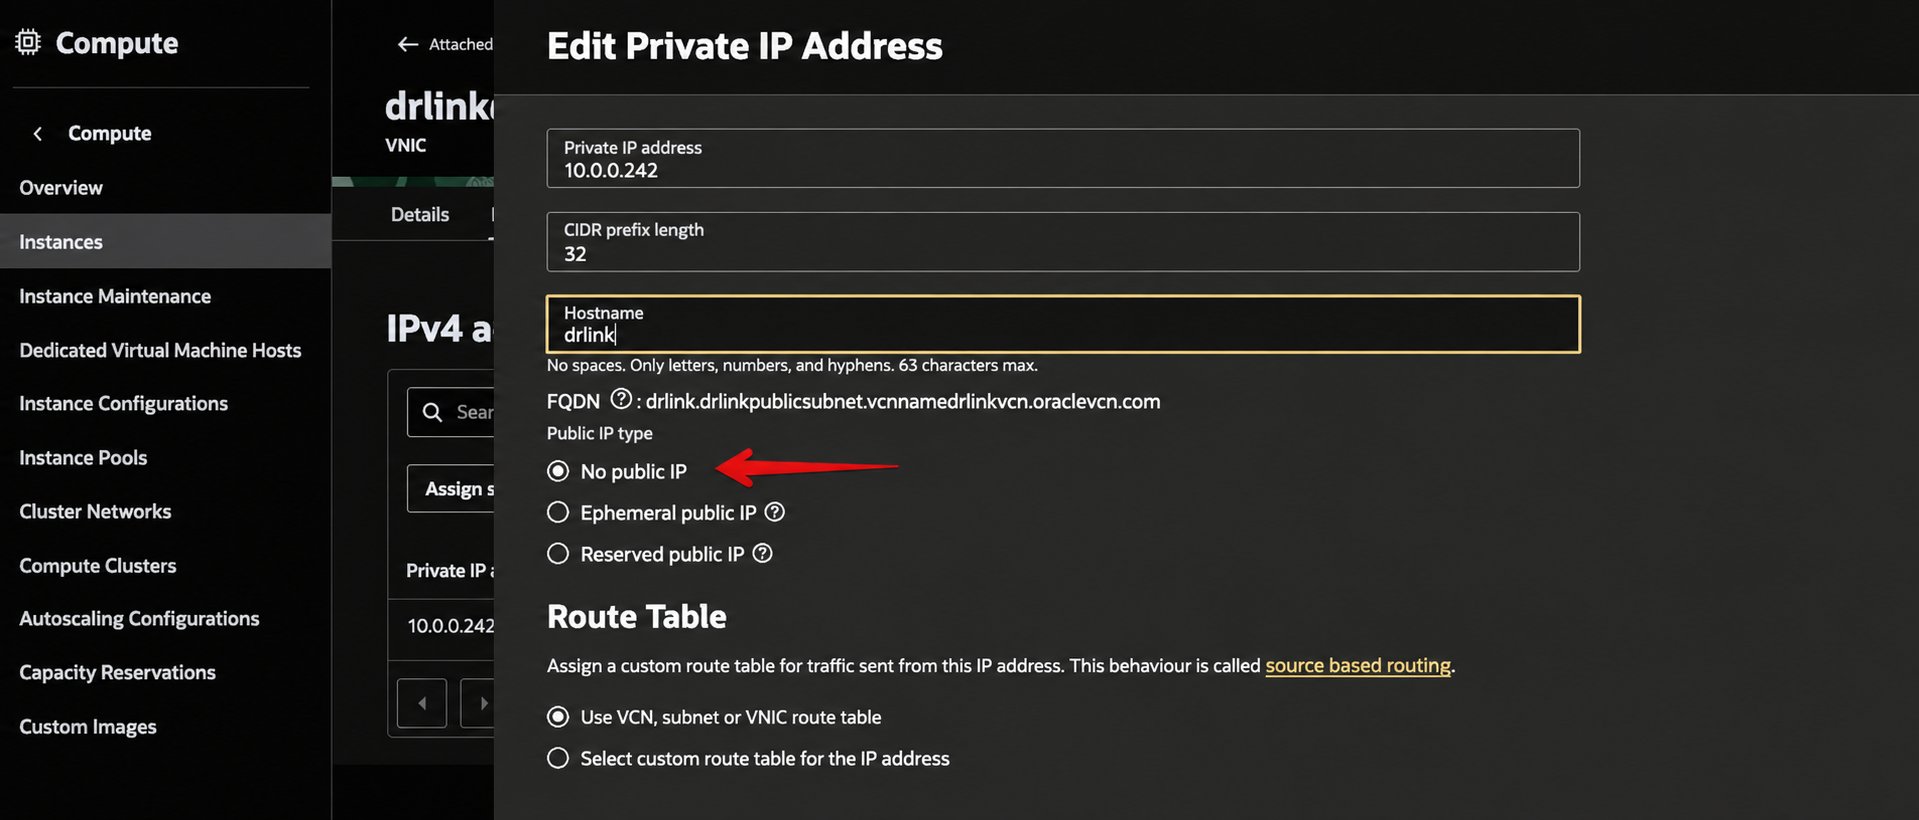
 기존 Ephemeral Public IP가 있다면 Edit에서 **No public IP**를 선택해 먼저 해제합니다.
 Public IP가 미할당 상태인지 확인합니다.
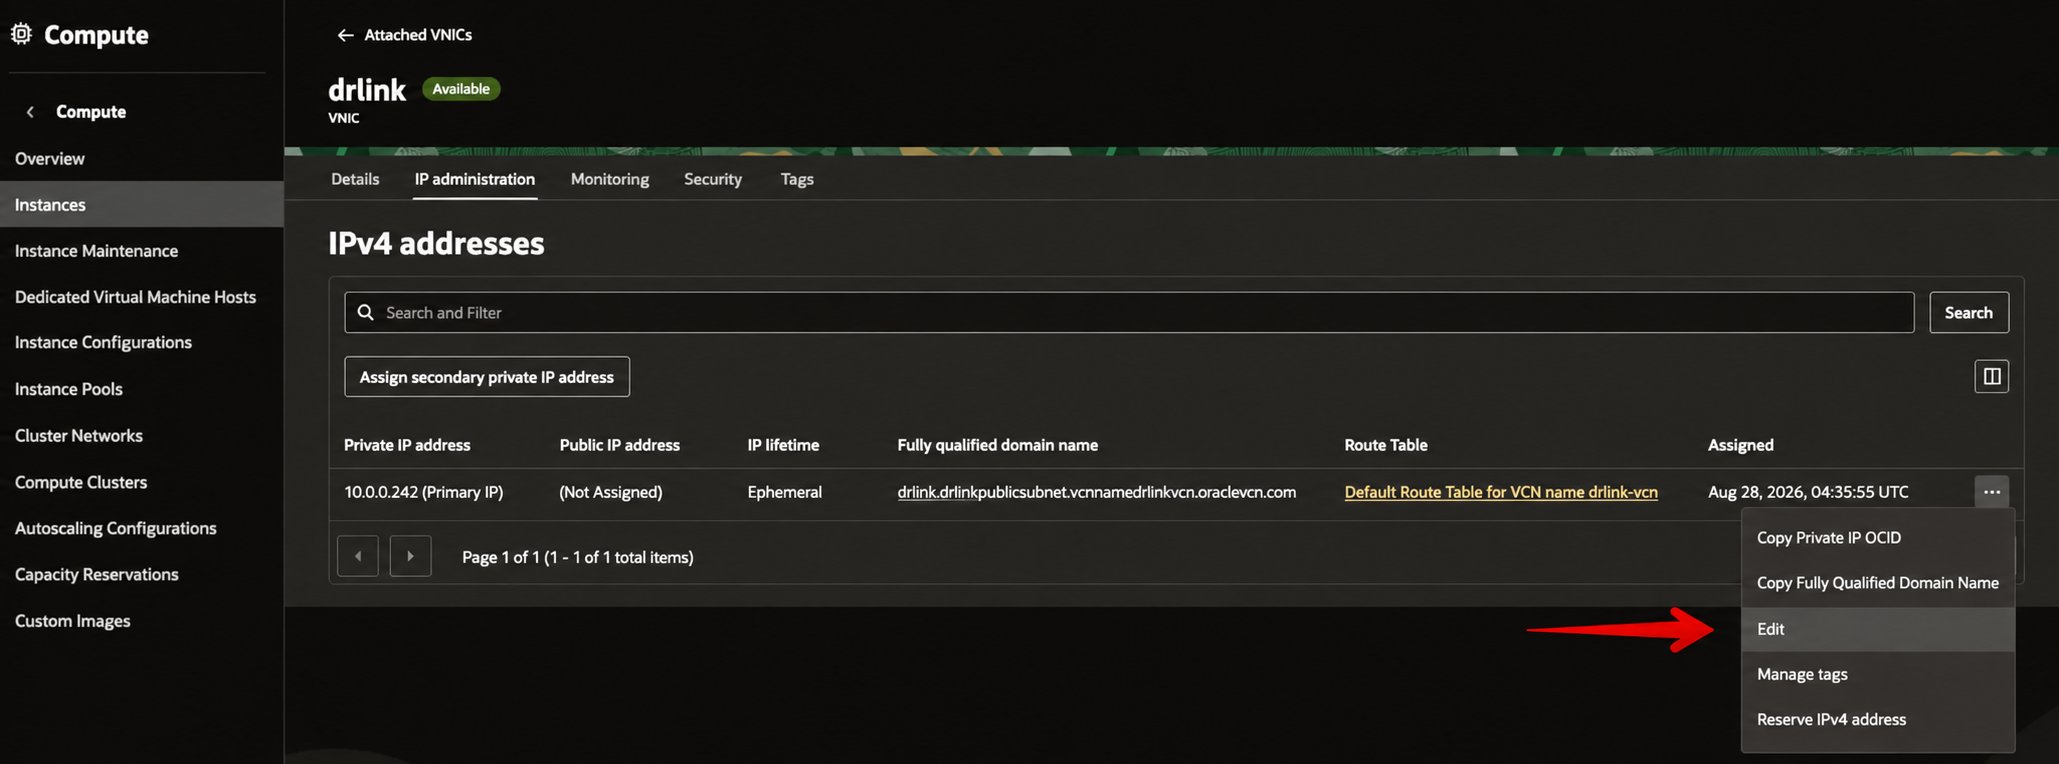 다시 Edit에서 다음 값을 선택합니다.
```text theme={null}
Public IP type Reserved public IP
Option Create new Reserved IP Address
Name data-relay-reserved-public-ip
```
다시 Edit에서 다음 값을 선택합니다.
```text theme={null}
Public IP type Reserved public IP
Option Create new Reserved IP Address
Name data-relay-reserved-public-ip
```
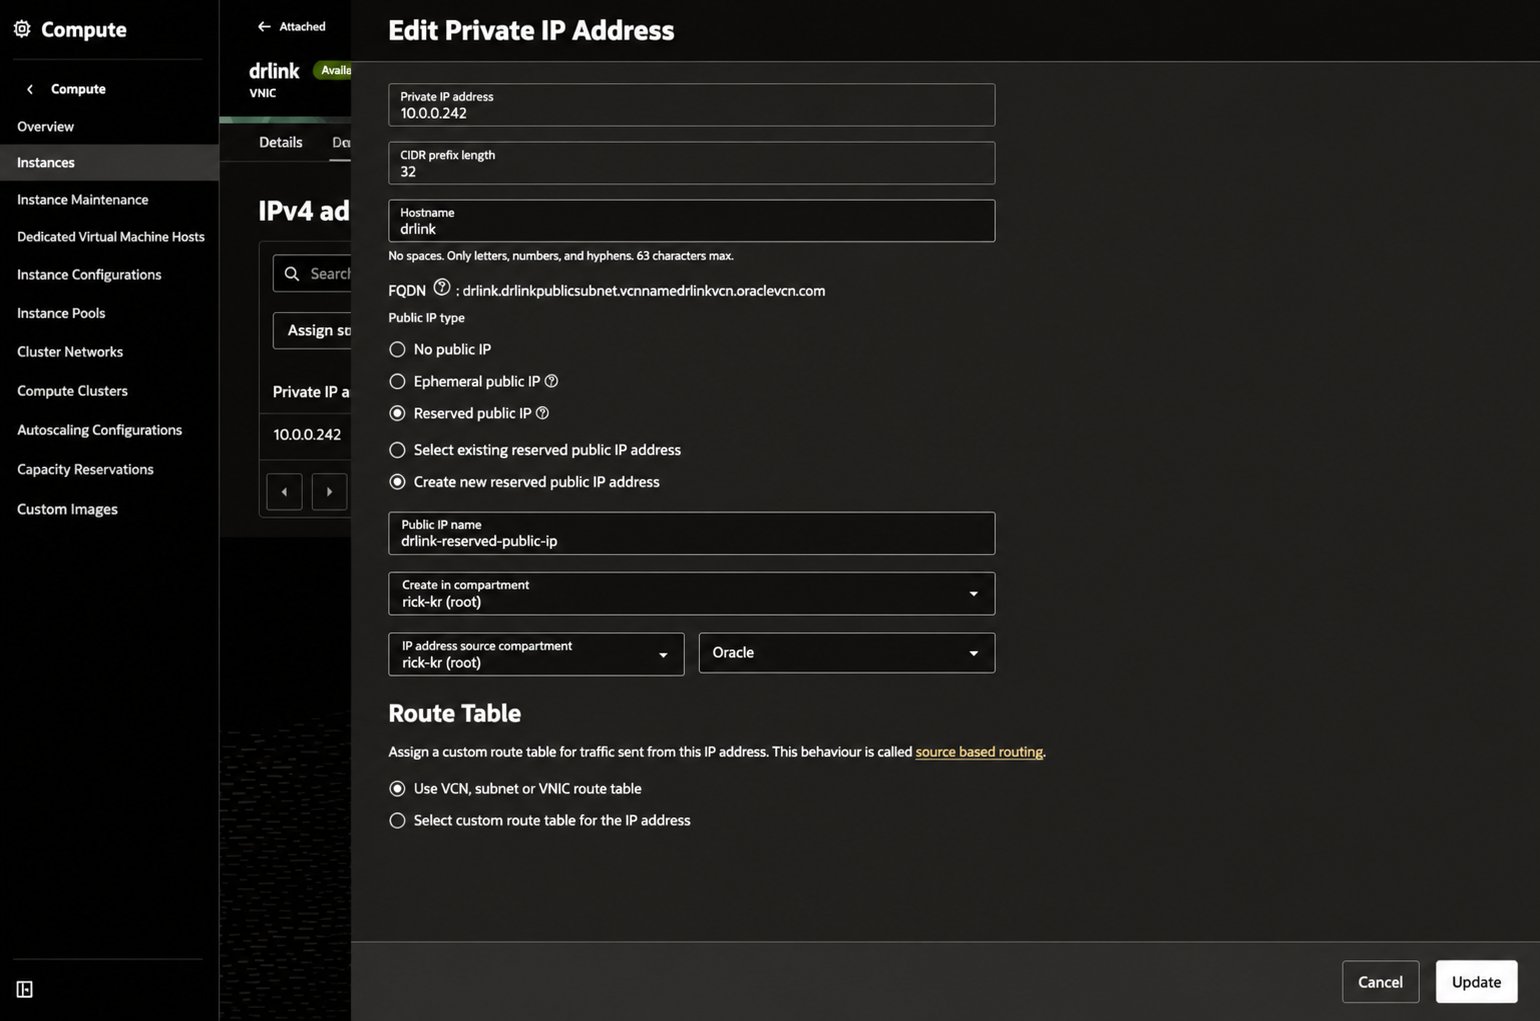 이 Reserved Public IP가 DataRelay Link의 지속적인 공인 진입점이 됩니다. OCI에서는 Public IP가 Ubuntu NIC에 직접 설정되는 것이 아니라 OCI 측에서 private VNIC 주소와 매핑되기 때문에 Ubuntu의 `ip addr`에서는 `10.x.x.x` 같은 Private IP만 보이는 것이 정상입니다.
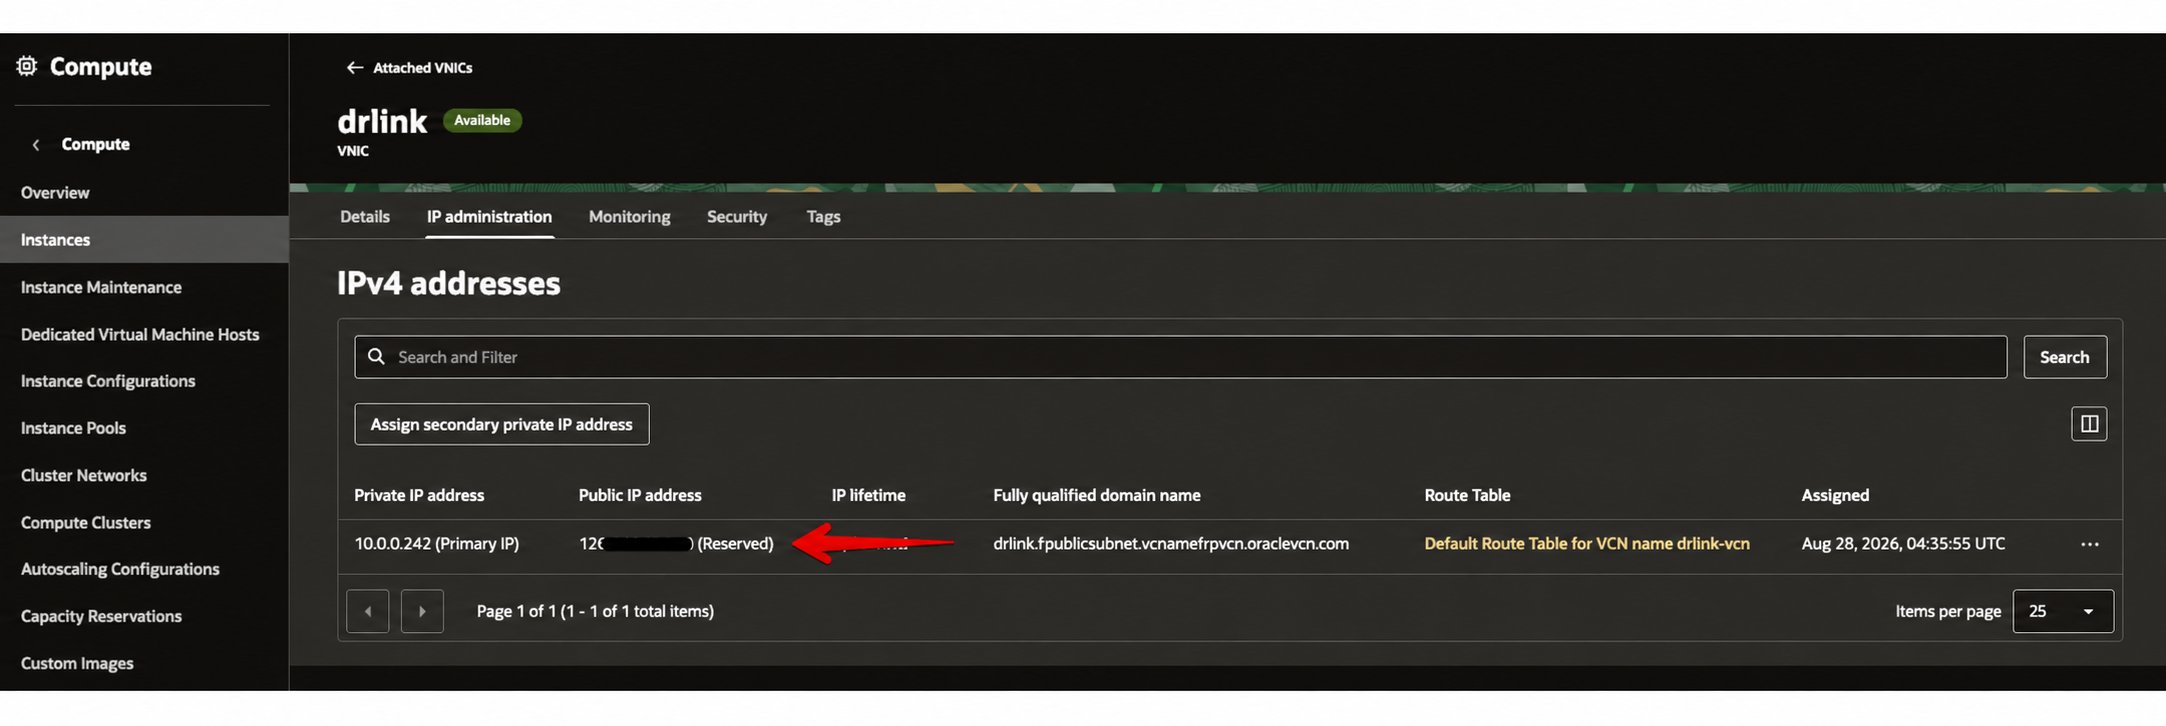
Reserved Public IP가 Primary Private IP에 정상 연결되었는지 확인합니다. 아래 그림 31의 공인 IP 값은 공개 문서용으로 마스킹된 화면입니다.
이 Reserved Public IP가 DataRelay Link의 지속적인 공인 진입점이 됩니다. OCI에서는 Public IP가 Ubuntu NIC에 직접 설정되는 것이 아니라 OCI 측에서 private VNIC 주소와 매핑되기 때문에 Ubuntu의 `ip addr`에서는 `10.x.x.x` 같은 Private IP만 보이는 것이 정상입니다.
Reserved Public IP가 Primary Private IP에 정상 연결되었는지 확인합니다. 아래 그림 31의 공인 IP 값은 공개 문서용으로 마스킹된 화면입니다.
 기존 Word 문서의 그림 32(SSH 접속 성공)는 실환경 접속 정보가 포함되어 있어 아직 공개하지 않습니다. 아래 SSH 절차에서는 `` placeholder를 사용합니다.
## 5. Ubuntu SSH 접속
OCI Ubuntu 기본 계정은 일반적으로 `ubuntu`입니다.
```bash theme={null}
chmod 600 ~/Downloads/
ssh -i ~/Downloads/ ubuntu@
```
접속 후:
```bash theme={null}
uname -m
cat /etc/os-release
systemctl --version
```
를 확인합니다.
```text theme={null}
Architecture x86_64
OS Ubuntu 24.04 LTS
PID 1 systemd
```
기존 Word 문서의 그림 32(SSH 접속 성공)는 실환경 접속 정보가 포함되어 있어 아직 공개하지 않습니다. 아래 SSH 절차에서는 `` placeholder를 사용합니다.
## 5. Ubuntu SSH 접속
OCI Ubuntu 기본 계정은 일반적으로 `ubuntu`입니다.
```bash theme={null}
chmod 600 ~/Downloads/
ssh -i ~/Downloads/ ubuntu@
```
접속 후:
```bash theme={null}
uname -m
cat /etc/os-release
systemctl --version
```
를 확인합니다.
```text theme={null}
Architecture x86_64
OS Ubuntu 24.04 LTS
PID 1 systemd
```